Transcribing data
Transcribing in DataScribe happens at the record level. Each record will become a row in the csv export of the dataset.
Depending on the original data, an item might have one record or many records. In either cases, you must add at least one record in order to transcribe data.
You access records through the items to which they are attached. There are two ways to get to the items in a dataset from the DataScribe dashboard. From the My Projects section of the dashboard, use the appropriate link to move to unlocked items or your items. You can also click on the name of a project from the All Projects or My Projects section, and then select the dataset you want to transcribe.
Once you are viewing the Items (the breadcrumb in the header should read Dashboard > Projects > Datasets > Items), click on the title of the item to which you want to add records. This should take you to a page for that item's records - the record browse for that item.
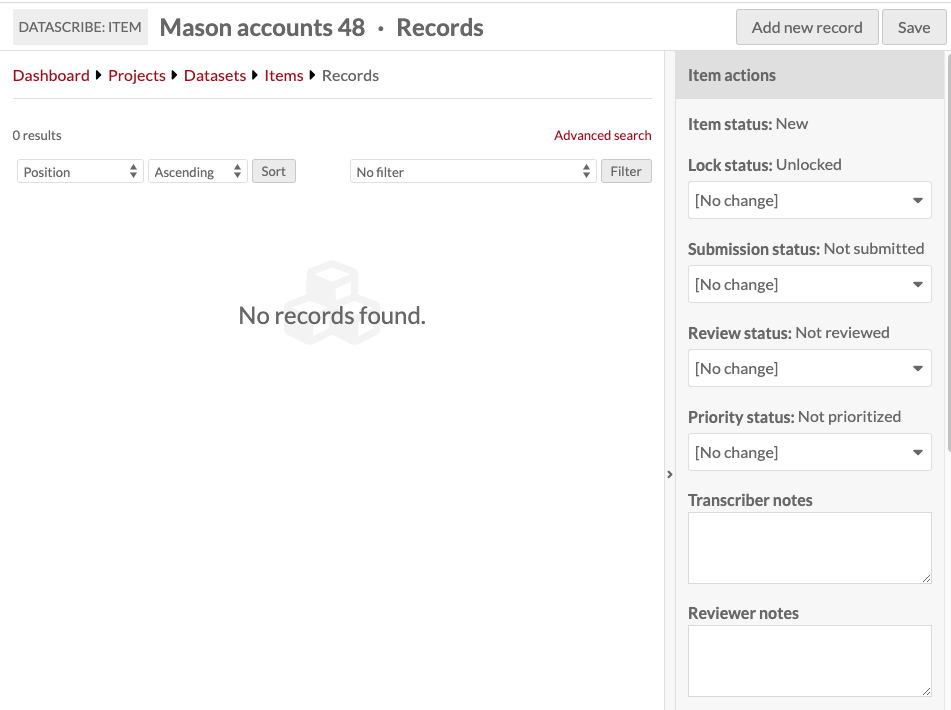
If this is an item which is “New” you should see a message “No records found”
On the right side of the window is a drawer with actions and information about the item. At the top of this drawer, under the section headed "Item actions" is a message with the current status of the item. For an item with no records, this should say "Item status: New".
The full range of options on the item are:
- Lock action: a dropdown which limits which transcribers can edit a record. Options are:
- No Change
- Lock to me
- Lock to a transcriber, with a list of transcriber users for this project
- Lock to a reviewer, with a list of reviewers for this project
- Lock to admin, with a list of admins for the Omeka S installation
- Submit action: a dropdown which allows a transcriber to indicate that the records for an item are ready for review. The only options are “No change” and “Submit for review”. This only becomes an action once you have created a record or somehow modified the item.
- Review action (reviewers and admins only): a dropdown where reviewers can mark the item as approved or not approved.
- Priority action (reviewers and admins only): a dropdown where reviewers can mark the item as prioritized.
- Transcriber notes: a place where transcribers can add notes on the item for the reviewers
- Reviewer notes: a place where reviewers can add notes on the items, for transcribers or other reviewers.
Reviewer and super users will see this view:
Depending on your role in the project, your options in the drawer will vary.
Transcribers are able to use the "Lock status" drop down to lock a new item to themselves.
Transcriber view before an item is locked:

Reviewers and Omeka S Superusers can add a record simply by clicking the "add a record" button in the upper right corner of the browser window.
To add a record as a transcriber, you must first lock the item to you:
- In the drawer on the right, use the Lock Action dropdown to select “Lock to me”
- Click the Save button in the upper right corner of the window.
- The page will reload and you should see a button to Add new record next to the Save button.
Once an item is locked to a transcriber, they are able to use the lock and submission status dropdowns and add text in the Transcriber notes field.
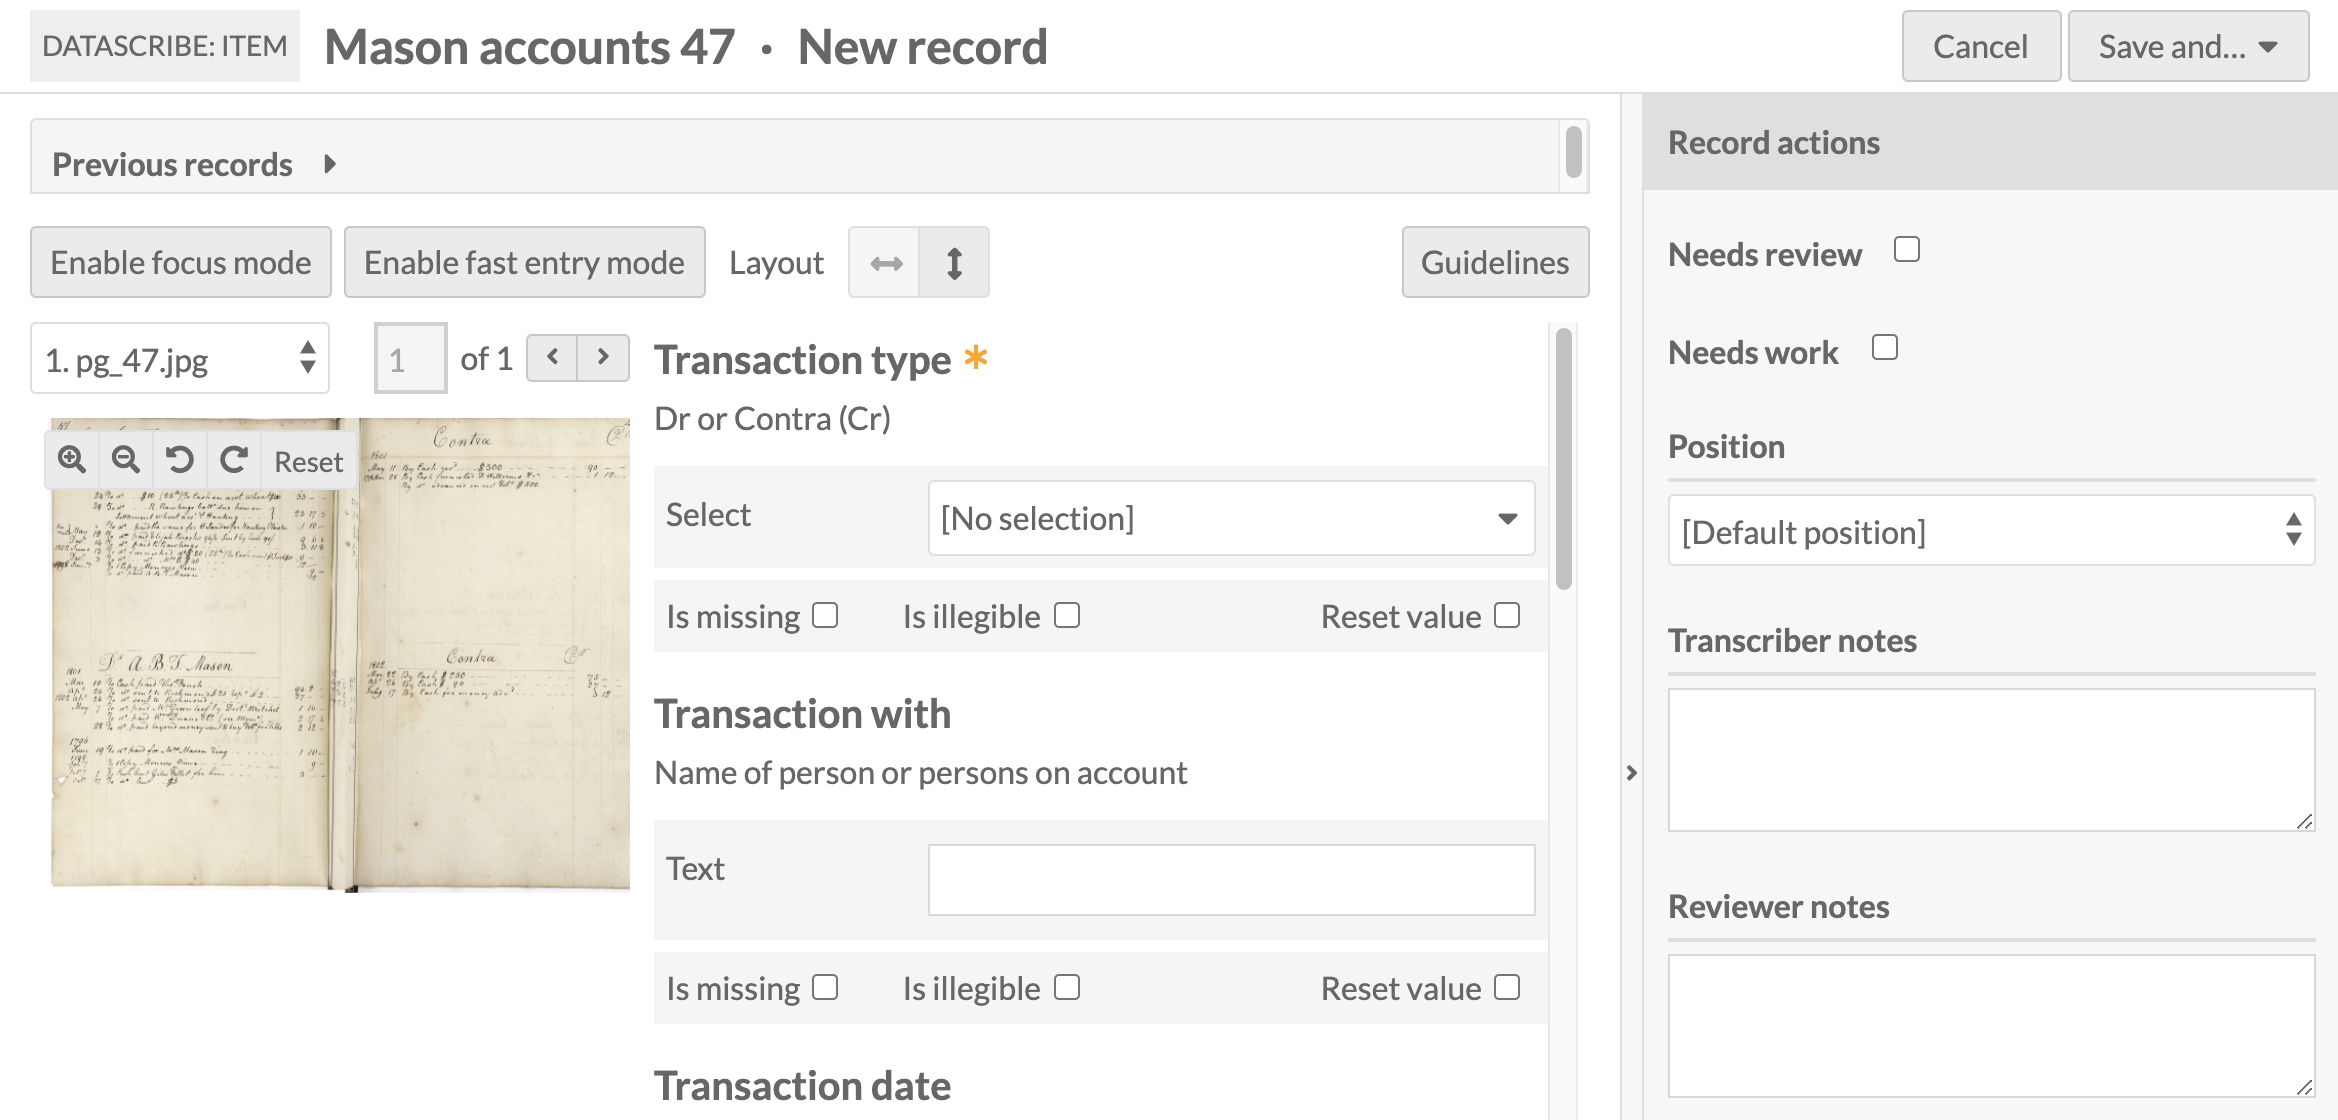
The transcription view in DataScribe includes the central work area (with the media and transcription form) and a record actions drawer on the right.
By default, the central work area loads with the image to be transcribed to the left of the transcription form.
If the item already has at least one record, the top of the central work area will include a collapsible area to display previous records. A table with next records will show up below the work area. These tables can serve as a helpful reference when you are working with an item with a large number of records.
Above the work area are buttons for the following functions:
- Focus mode
- Fast entry mode
- Layout buttons
- Guidelines button opens the dataset guidelines briefly as a pop up over the window, as an easily accessible quick reference.

Focus mode toggles between standard view and a full-window view which hides the Omeka S navigation and the right-hand drawer. This gives more room for the media viewer and the form editor. The image below shows the same size browser window in normal and focus modes.

Fast entry mode hides the checkboxes for "is missing," "is illegible" and "reset value". It allows you to move more quickly through form entry, particularly when using keyboard navigation.
The Layout buttons toggle the arrangement of the media viewer in relation to the form entry. Whichever button is lighter is currently active. the horizontal arrow (-) places the media viewer to the left of the transcription form. The vertical arrow (|) puts the media viewer above the transcription form.
The Guidelines button opens the guidelines for transcribing the dataset; these open as a dialog box over the transcription window, so you won't lose any changes.
If the item has more than one piece of media, there will be pagination tools above the media display area.
You can either use the page dropdown to select which page you want (labeled A below), or you use the pagination buttons to click through one by one (labeled B below). Changing the page in the media viewer will not reset anything else on the browser page; it is safe to shift between media pages while transcribing.
The media viewer has five buttons which you can use to manipulate the image. You can:
- zoom in and out (magnifying glass buttons, labeled C below),
- rotate left or right (circular arrow buttons, labeled D below), and
- reset to the original view (labeled E below).

- A. dropdown page selector
- B. pagination buttons
- C. zoom controls
- D. image rotation
- E. reset to original zoom and rotation.
If the area for viewing media is very small, you can try the follow options. First, use the arrow icon on the edge of the Record actions drawer on the right side of the browser to collapse the drawer and gain more space. Second, try toggling between side by side and top-bottom layouts for the media and form. Finally, focus mode expands the work area to take the entire browser window.
The form will display with fields as set by the project reviewers and admins. Possible form inputs include:
- Checkbox: either check or uncheck as appropriate
- Date: three dropdowns, one each for year, month (text not numeric), and day.
- DateTime: a series of dropdowns, which allow you to enter a date and time. Dropdown menus exist for year, month, day, hour, minute, and second. The hours are given in 24 hour time.
- Time: three dropdowns, for hour, minute, and second. The hours are given in 24 hours time.
- Number: a field in which you can only enter integers. When the field is active, there is an up-down toggle on the right side which you can use to step the number up or down in predetermined increments.
- Select: dropdown with options set by the form builder.
- Text: either a single line of text, or a large area for longer text.
See the form builder page for more information on these options. Note that if you put the wrong data type into a field (for example, text in a number field), the record will be marked as invalid.
Required fields are marked with a red asterisk. If you do not enter information in a required field, DataScribe will mark the field - and the record - as invalid.
Every field type for the form offers a series of checkbox options in addition to the input. How these are applied will vary by project. Check your guidelines! If you are still unclear, contact a reviewer or the project lead. Note that these are DataScribe workflow flags - they do not show up in the exported csv files of the data.
- Is missing: use when there is no data available for this property, as directed by the project guidelines.
- If there are no guidelines, contact your project administrator before using this setting.
- Note that leaving a field blank results in a “null” value (see below)
- Examples of how you might use this include damage to the original document causing that part of the page to be physically missing, or this field left blank by whoever originally filled out the paperwork.
- Is illegible: use to indicate illegible entries in the original form or data.
- Reset value will revert this value to the default options when you save your changes. When checked, you cannot interact with the data entry options for this field.
A note on null values: Null values for required fields will be flagged by DataScribe as invalid unless they are also marked as illegible or missing. Illegible or missing values are always valid.
The record actions drawer has status checkboxes for record, as well as space for transcribers and reviewers to communicate with each other about the record.
You can expand or collapse the record actions drawer by clicking on the right arrow button ( > ) in the border area between the workspace and the drawer.

The “Needs review” checkbox is intended for transcribers to use in order to flag a record for their reviewers. Remember that approval happens at the item level so the "review" flag on a record should be used to request help. Use the Transcriber notes text box to leave a note for the reviewer to explain why you have flagged the record.
The “Needs work” checkbox is for reviewers only, and allows them to flag a record as needing revision and further work before it is approved. Use the Reviewer notes text box to leave a message explaining what work needs to be done.
If this is at least the second record for this item, you can adjust the record position using the position dropdown. By default, a record is added immediately following the previous created record. Record position allows you to insert a missed row if needed. The initial position dropdown offers three options:
- Default position
- Insert before
- Insert after
If you choose “insert before” or “insert after”, a second dropdown will appear with all the records in this item, giving their record number and primary field.

Note that record numbers are assigned by DataScribe across all projects and datasets. Therefore it is entirely possible for an item to have non-sequential record numbers (for example: 1,2 ,3, 5, 16, 17, 20). Select the appropriate record from the dropdown, changes will be applied when you save.
There are two open text boxes, one for transcriber notes and one for reviewer notes. These are visible in the record metadata.
When you have completed transcribing the record, use the save button in the upper right corner. You have three options:
- Save and add another: saves this record and takes you to a new record page for the same item.
- Save and return to records: saves this record and takes you back to the record page for this item.
- Save and stay on this record: saves your progress so far and keeps you on this record.