Flightmode Settings
On the input configuration page:
You can select which behaviour the different flight mode trigger, and use this to change modes while flying. The level of assistance can be summarized as follows:
Leveling > Horizon > Weak Leveling > Acro > Acrodyne > Acro+ > None (manual)
This means the fairly typical thing for what Acro mode is called. The roll and pitch axes are assigned to rate mode (see below for details and tuning) and the yaw axis is assigned to Axis Lock (slightly better tracking than rate).
Acro with a bit of help...
Abstract from the forum: "The idea with AcroDyne is that you can configure your maximum rates, but when you're at/near full stick deflection that you can dynamically accelerate beyond your maximum rates. It's a more controlled version of Acro+ (that makes more sense from a controls perspective and is also a fair bit more locked in)." Forum Discussion
AcroPlus on both Roll and Pitch with Rate on Yaw. See below for details on AcroPlus.
This is a self levelling mode. The roll and pitch axes are set to Attitude (see below for details and tuning) and the yaw axis is assigned to Axis Lock.
Horizon is based on MultiiWii Horizon mode. It smoothly transitions from attitude mode in the middle to rate mode on the stick extremes. It uses the tuning from the separate modes so once they are both well tuned it should work well. This is useful for FPV where you might want tight self leveling and control plus rate mode.
Helicopter only! This is an advanced variant of rate that has its own PID and the ability to disable gyro and put a lot more throw on the output. This is required to properly actuate the cyclic. The roll and pitch axis are both set to Virtual Bar (see below for details and tuning) and the yaw axis is assigned to Axis Lock.
In other words, this flight mode switches from acro with custom PID to manual.
Do not use this flight-mode unless you've properly set the PID in the system setting (see below)!
In this mode, by default you will be flying in a vario mode. That means that if your throttle is high the aircraft will climb and if it is low it will descend. There is a deadband around mid throttle where it will hold the current altitude and an exponential component to the range to make it less sensitive in the middle.
See examples of this mode https://vimeo.com/88439963 and https://vimeo.com/88549064
To use this, make sure you enable the AltitudeHold module and reboot, or you will have a configuration error. Also with the current code you cannot arm in this mode so if you are disarmed and in AltitudeHold mode you will have an error.
- Tuning is done through uavobjects in the object browser ([system] tab), there's no direct GCS interface.
-
AltitudeHoldSettings.AttitudeComp: In Altitude Hold mode there is compensation for the bank angle to allow the MR to hold altitude as it flies forward or bank left/right. This can be disabled by setting AltitudeHoldSettings.TiltCompensation to 0. TiltCompensation can also be adjusted if you find it drops as you start flying forward, by setting it to greater than 100%. Often values like 200% are needed. 150% is a good starting point.
-
AltitudeHoldSettings.{MaxClimbRate,MaxDescentRate}: To change the stick sensitivity. Set this to zero if you do not want to be able to climb or descend and just want it to hold altitude. The default max climb rate of 40dm/s is a bit rough, 20dm/s makes the aircraft very docile.
-
AltitudeHoldSettings.Expo: adjustable exponential on the throttle around hover point. Increase to make it less sensitive near the middle. To be used in conjunction with .Deadband setting (see below).
-
AltitudeHoldSettings.Deadband: dead-band near the centre position where the board will just hold altitude. As a starting point with 10% dead-band and 20% expo one has to push the stick 4 clicks above hover point in order to change altitude significantly. Large .Deadband should not be used in conjunction with large .Expo: once the stick leaves the dead-band, it should not enters a section were expo switches from precise to large input commands.
-
AltitudeHoldSettings.{PositionKp,VelocityKp,VelocityKi}: PID settings for the altitude controller. There is an outer loop (that is tuned by PositionKp) that requests a faster desired velocity (up to MaxRate) the further from the set point the FC is. There is a VelocityKp and VelocityKi for the inner loop that goes from velocity error to throttle position. When moving the stick (requesting a change in height) only VelocityKp and VelocityKi matter as the stick sets the desired velocity.
Ask on the forums and make sure you fully understand how to attempt this before using these modes.
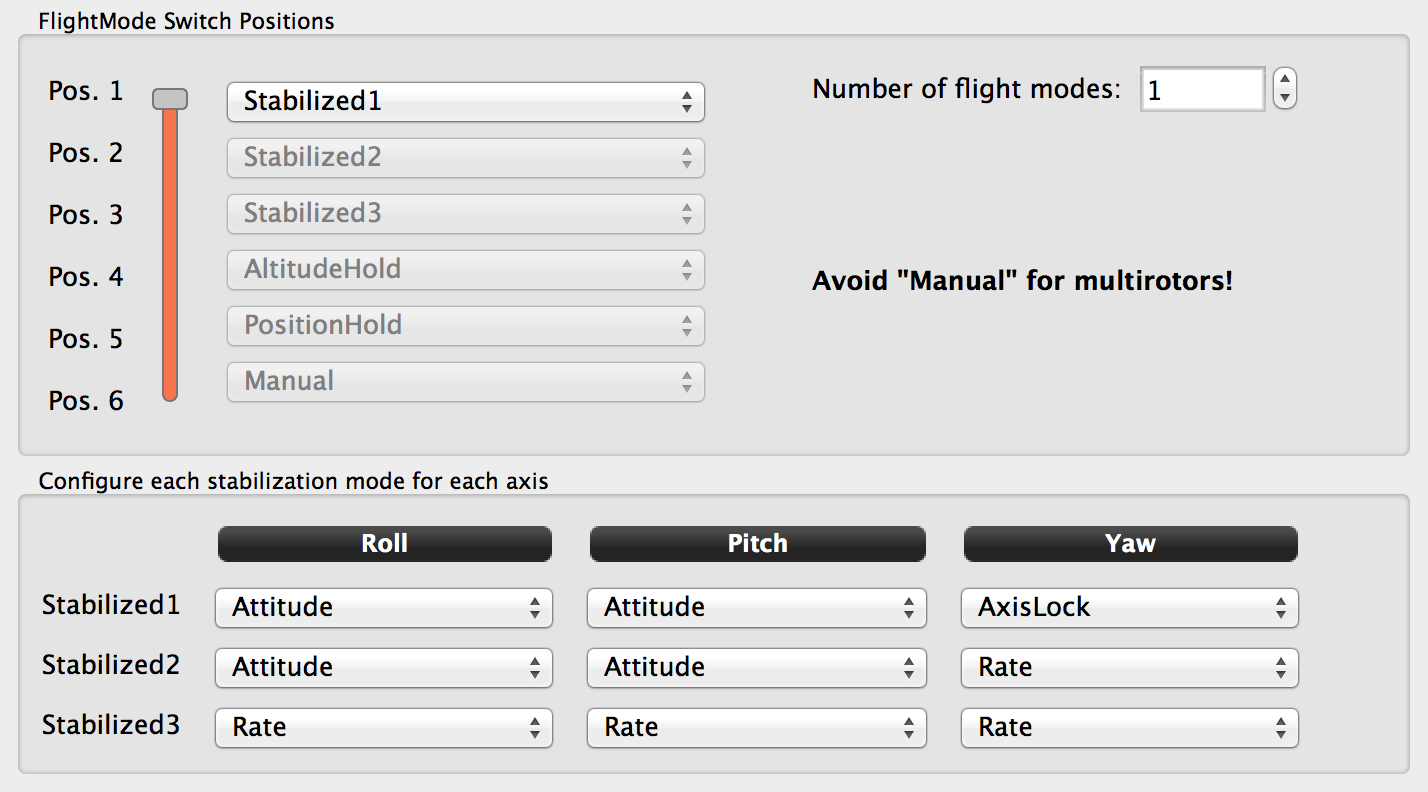
These modes are for customizing what each axis does. So, for example, Stabilized1 in the photo above will use Attitude for Roll and Pitch and AxisLock for Yaw. To understand what these individual axis selections do, please read below.
No stabilization on this axis. Inputs are directly passed to outputs.
dRonin will aim for a target rate of turn around the axis. This target is defined by the manual control. When the manual control is neutral, dRonin will try to maintain zero rotation. E.g. on a multirotor, in "rate mode", the angle of the elevation/aileron sticks determines the rate of change of the pitch and roll axis. If you let go and return to a neutral position, the airframe will keep going in that (possibly inverted) direction. It's up to the pilot to return the craft to level, so it behaves like a "real" aircraft.
Stabilization mode based on Rate inner loop featuring stick and multiplier based Gyro Suppression such as, but not limited to:
- OpenPilot Rate with AcroPlus/
PiroComp/CruiseControletc. - CleanFlight MultiWii Rewrite
- TauLabs MWRate / MultiWii Rate
The default Gyro Suppression is 40%, configured with the StabilizationSettings.AcroInsanityFactor UAVO or BrainFPV OSD Menu under Stick Scaling / Expo "Acro Insanity Factor". The name of the configuration UAVO was preserved to pay homage to the OpenPilot project's implementation.
dRonin will aim for a target attitude. This target is defined by the manual control. When the manual control is neutral, dRonin will steer towards level flight. This applies an offset (from TrimAnglesSettings) to the requested attitude. For details on how to trim this go here
E.g. on a multirotor, in "attitude mode", the angle of the elevation/aileron sticks directly determines the set point for the pitch and the roll axis of the multirotor. If you let go and return the stick to a neutral position the multirotor would level and drift to a halt in hover.
This feels similar to rate mode but can provide a more locked-in feeling. Axis lock essentially grabs the current position of the axis when you let go of the stick and tries to stay there.
MaxAxisLockRate is what decides whether you're in axislock or not, based on stick input. So you need to stick under this rate for the lock to be active. Default value is 3%, i.e lock active when stick is not touched.
MaxAxisLock is the maximum deviation it will integrate and try to get rid of. In other words this is the maximum correction applied for the lock. Default value is 15°.
One may raise MaxAxisLockRate up to 10-15% and reduce MaxAxisLock down to 5-10% in order to have assistance on a wider stick bandwidth while reducing the "sluggish" feeling of the lock.
Weak leveling is basically rate mode with a slow component to make the attitude go towards zero. In weak leveling your aircraft slowly drifts back to level - sort of rate mode with an assist. Note that it's not recommended for yaw because it basically will turn your nose facing forward again. The authority of the leveling is defined by StabilizationSettings.WeakLevelingKp. 0.33 means : if there's an error of 45 degrees, try to fix it at 15 deg/sec (45*0.33=15). This correction will in turn decrease as the aircraft gets closer to level. The default of 0.33 is really weak. Autotuned kp's for normal leveling mode are generally around 5-7 (and the sluggish default is 2.5). At the same time, weakleveling kp * 180 needs to be small compared to stick inputs for leveling not to "win".
This mode can be compared to a standard flybarless controller. It is meant for heli, but for multi rotors a much more aggressive roll and flip rate "could" be achieved, as it deactivates the gyro, allowing for full motor output on aggressive manoeuvrers. Please note, this flight mode was tested with mixed-success on multicopter; fly Acro+ for these characteristics instead.
As a starting point one is advised to define a high level of stick input before deactivating gyro.
- Tuning is done through uavobjects in the object browser ([system] tab), there's no direct GCS interface.
- Autotune does not set vBar PIDs (leaves them untouched)
Remember this mode has its own PID settings! As a starting point one should copy the standard PID settings to the vBar settings and define a proper stick position for Gyro deactivation.
[Settings] > [StabilizationSettings]
- [vBarSensitivity] : as a starting point copy [iLimit] values from [PitchRatePID] [RollRatePID] [YawRatePID]
- [vBarRollPID] : as a starting point copy [Kp],[Ki],[Kd] values from [RollRatePID]
- [vBarPitchPID] : as a starting point copy [Kp],[Ki],[Kd] values from [PitchRatePID]
- [vBarYawPID] : as a starting point copy [Kp],[Ki],[Kd] values from [YawRatePID]
- [VbarTau] Default value is 0.5. ** TODO **
- [VbarGyroSuppress] : Use 50% as a starting point, the default value of 30% is really aggressive.
- [VbarPiroComp] Default value is false. ** TODO ; to be tested on a heli! **
- [VBarMaxAngle] Default value is 10°. ** TODO **
This is used for tracking a point-of-interest, usually provided by a tablet.
This mode is used for planes with a rudder and will apply rudder during turns to try and have zero side slip. This mode should only be used on planes yaw axis.