3D virtual assistant SDK that enables you to make your 3D model into a voice-enabled chatbot. 🇯🇵日本語のREADMEはこちら
- 🍎 iOS App: OshaberiAI A Virtual Agent App made with ChatdollKit: a perfect fusion of character creation by AI prompt engineering, customizable 3D VRM models, and your favorite voices by VOICEVOX.
- 🇬🇧 Live demo English Say "Hello" to start conversation. This demo just returns what you say (echo).
- 🇯🇵 Live demo in Japanese OpenAI API Keyをご用意ください。「こんにちは」と話しかけると会話がスタートします。
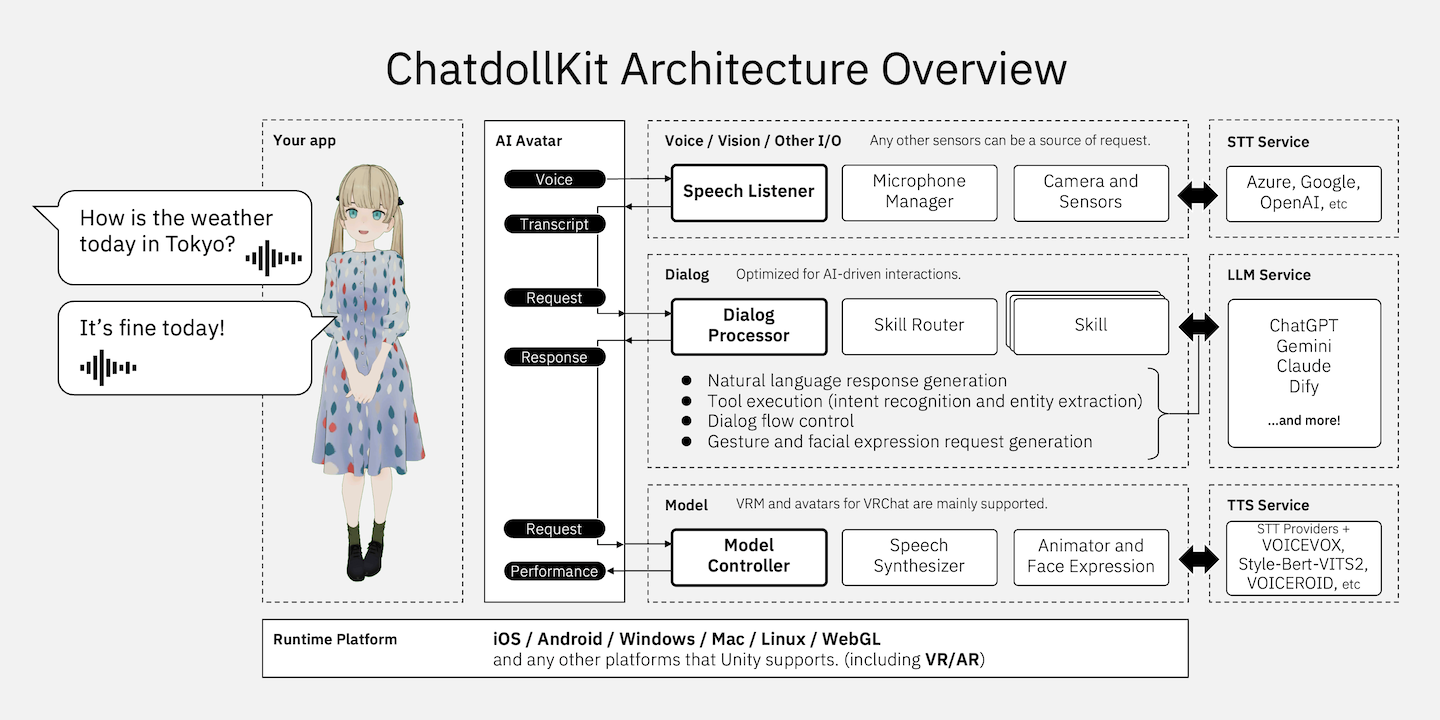
- Generative AI Native: Supports multiple LLMs like ChatGPT, Anthropic Claude, Google Gemini Pro, Dify, and others, with function calling (ChatGPT/Gemini) and multimodal capabilities.
- 3D model expression: Synchronizes speech and motion, controls facial expressions and animations autonomously, supports blinking and lip-sync.
- Dialog control: Integrates Speech-to-Text and Text-to-Speech (OpenAI, Azure, Google, Watson, VOICEVOX, VOICEROID, etc.), manages dialog state (context), extracts intents and routes topics, supports wakeword detection.
- Multi platforms: Compatible with Windows, Mac, Linux, iOS, Android, and other Unity-supported platforms, including VR, AR, and WebGL.
- 🏷️ User-Defined Tags Support: You can now include custom tags in AI responses, enabling dynamic actions. For instance, embed language codes in replies to switch between multiple languages on the fly during conversations.
- 🌐 External Control via Socket: Now supports external commands through Socket communication. Direct conversation flow, trigger specific phrases, or control expressions and gestures, unlocking new use cases like AI Vtubers and remote customer service. Check out the client-side demo here: https://gist.github.com/uezo/9e56a828bb5ea0387f90cc07f82b4c15
- ⚡ Optimized AI Dialog Processing: We've boosted response speed with parallel processing and made it easier for you to customize behavior with your own code. Enjoy faster, more flexible AI conversations!
- 🥰 Emotionally Rich Speech: Adjusts vocal tone dynamically to match the conversation, delivering more engaging and natural interactions.
- 🎤 Enhanced Microphone Control: Microphone control is now more flexible than ever! Easily start/stop devices, mute/unmute, and adjust voice recognition thresholds independently.
You can learn how to setup ChatdollKit by watching this video that runs the demo scene(including chat with ChatGPT): https://www.youtube.com/watch?v=rRtm18QSJtc

To run the demo for version 0.8, please follow the steps below after importing the dependencies:
- Open scene
Demo/Demo08. - Select
AIAvatarVRMobject in scene. - Set OpenAI API key to following components on inspector:
- ChatGPTService
- OpenAITTSLoader
- OpenAISpeechListener
- Run on Unity Editor.
- Say "こんにちは" or word longer than 3 characters.
- 📦 Setup New Project
- 🎓 LLM Service
- 🗣️ Speech Synthesizer (Text-to-Speech)
- 🎧 Speech Listener (Speech-to-Text)
- ⏰ Wake Word Detection
- ⚡️ AI Agent (Tool Call)
- 🎙️ Devices
- 🥰 3D Model Control
- 🎚️ UI Components
- 🛜 Remote Access
- 🌐 Run on WebGL
- ❤️ Thanks
The steps for setting up with a VRM model are as follows. For instructions on using models for VRChat, refer to README v0.7.7.
Download the latest version of ChatdollKit.unitypackage and import it into your Unity project after import dependencies;
Burstfrom Unity Package Manager (Window > Package Manager)- UniTask(Tested on Ver.2.5.4)
- uLipSync(Tested on v3.1.0)
- UniVRM(v0.89.0)
- ChatdollKit VRM Extension
- JSON.NET: If your project doesn't have JSON.NET, add it from Package Manager > [+] > Add package from git URL... > com.unity.nuget.newtonsoft-json
- Azure Speech SDK: (Option) Required for real-time speech recognition using a stream.

Add 3D model to the scene and adjust as you like. Also install required resources for the 3D model like shaders etc.
And, import animation clips. In this README, I use Anime Girls Idle Animations Free that is also used in demo. I believe it is worth for you to purchase the pro edition👍
Add the ChatdollKit/Prefabs/AIAvatarVRM prefab to the scene. And, create EventSystem to use UI components.
![]()
Select Setup ModelController in the context menu of ModelController.

Select Setup Animator in the context menu of ModelController and select the folder that contains animation clips or their parent folder. In this case put animation clips in 01_Idles and 03_Others onto Base Layer for override blending, 02_Layers onto Additive Layer for additive blending.

Next, see the Base Layer of newly created AnimatorController in the folder you selected. Confirm the value for transition to the state you want to set it for idle animation.

Lastly, set the value to Idle Animation Value on the inspector of ModelController.

On the inspector of AIAvatar, set Wake Word to start conversation (e.g. hello / こんにちは🇯🇵), Cancel Word to stop comversation (e.g. stop / おしまい🇯🇵), Error Voice and Error Face that will be shown when error occured (e.g. Something wrong / 調子が悪いみたい🇯🇵).
Prefix / Suffix Allowance is the allowable length for additional characters before or after the wake word. For example, if the wake word is "Hello" and the allowance is 4 characters, the phrase "Ah, Hello!" will still be detected as the wake word.
![]()
Attach the component corresponding to the LLM service from ChatdollKit/Scripts/LLM and set the required fields like API keys and system prompts. In this example, we use ChatGPT, but the framework also supports Claude, Gemini, and Dify.

Attach the SpeechListener component from ChatdollKit/Scripts/SpeechListener for speech recognition and the TTSLoader component from ChatdollKit/Extension for speech synthesis. Configure the necessary fields like API keys and language codes. Enabling PrintResult in the SpeechListener settings will output recognized speech to the log, useful for debugging.

Add ChatdollKit/Prefabs/Runtime/MicrophoneController to your scene. This provides a UI to adjust the minimum volume for speech recognition. If the environment is noisy, you can slide it to the left to filter out background noise.

Press Play button of Unity editor. You can see the model starts with idling animation and blinking.
- Adjust the microphone volume slider if necessary.
- Say the word you set to
Wake Wordon inspector. (e.g. hello / こんにちは🇯🇵) - Your model will reply "Hi there!" or something.

Enjoy👍
We support ChatGPT, Claude, Gemini, and Dify as text generation AI services. Experimental support for Command R is also available, but it is unstable. To use LLM services, attach the LLMService component you want to use from ChatdollKit/Scripts/LLM to the AIAvatar object and check the IsEnabled box. If other LLMServices are already attached, make sure to uncheck the IsEnabled box for those you don't plan to use.
You can configure parameters like API keys and system prompts directly on the attached LLMService in the inspector. For more details of these parameters, please refer to the API references for the LLM services.
You can autonomously control facial expressions according to the conversation content.
To control expressions, include tags like [face:ExpressionName] in the AI responses, which can be set through system prompts. Here's an example of a system prompt:
You have four expressions: 'Joy', 'Angry', 'Sorrow', 'Fun' and 'Surprised'.
If you want to express a particular emotion, please insert it at the beginning of the sentence like [face:Joy].

Example
[face:Joy]Hey, you can see the ocean! [face:Fun]Let's go swimming.
The expression names must be understandable by the AI. Make sure they match exactly, including case sensitivity, with the expressions defined in the VRM model.
You can also control gestures (referred to as animations) autonomously based on the conversation content.
To control animations, include tags like [anim:AnimationName] in the AI responses, and set the instructions in the system prompt. Here's an example:
You can express your emotions through the following animations:

- angry_hands_on_waist
- brave_hand_on_chest
- calm_hands_on_back
- concern_right_hand_front
- energetic_right_fist_up
- energetic_right_hand_piece
- pitiable_right_hand_on_back_head
- surprise_hands_open_front
- walking
- waving_arm
- look_away
- nodding_once
- swinging_body

If you want to express emotions with gestures, insert the animation into the response message like [anim:waving_arm].

Example
[anim:waving_arm]Hey, over here!
The animation names must be clear to the AI for it to understand the intended gesture.
To link the specified animation name to the animation defined in the Animator Controller, register them in LLMContentSkill through code as shown below:
// Base
llmContentSkill.RegisterAnimation("angry_hands_on_waist", new Model.Animation("BaseParam", 0, 3.0f));
llmContentSkill.RegisterAnimation("brave_hand_on_chest", new Model.Animation("BaseParam", 1, 3.0f));
llmContentSkill.RegisterAnimation("calm_hands_on_back", new Model.Animation("BaseParam", 2, 3.0f));
llmContentSkill.RegisterAnimation("concern_right_hand_front", new Model.Animation("BaseParam", 3, 3.0f));
llmContentSkill.RegisterAnimation("energetic_right_fist_up", new Model.Animation("BaseParam", 4, 3.0f));
llmContentSkill.RegisterAnimation("energetic_right_hand_piece", new Model.Animation("BaseParam", 5, 3.0f));
llmContentSkill.RegisterAnimation("pitiable_right_hand_on_back_head", new Model.Animation("BaseParam", 7, 3.0f));
llmContentSkill.RegisterAnimation("surprise_hands_open_front", new Model.Animation("BaseParam", 8, 3.0f));
llmContentSkill.RegisterAnimation("walking", new Model.Animation("BaseParam", 9, 3.0f));
llmContentSkill.RegisterAnimation("waving_arm", new Model.Animation("BaseParam", 10, 3.0f));
// Additive
llmContentSkill.RegisterAnimation("look_away", new Model.Animation("BaseParam", 6, 3.0f, "AGIA_Layer_look_away_01", "Additive Layer"));
llmContentSkill.RegisterAnimation("nodding_once", new Model.Animation("BaseParam", 6, 3.0f, "AGIA_Layer_nodding_once_01", "Additive Layer"));
llmContentSkill.RegisterAnimation("swinging_body", new Model.Animation("BaseParam", 6, 3.0f, "AGIA_Layer_swinging_body_01", "Additive Layer"));Besides expressions and animations, you can execute actions based on developer-defined tags. Include the instructions to insert tags in the system prompt and implement HandleExtractedTags.
Here's an example of automatically switching languages during the conversation based on the content:
If you want change current language, insert language tag like [language:en-US].

Example:
[language:en-US]From now on, let's talk in English.
chatGPTService.HandleExtractedTags = (tags, session) =>
{
    if (tags.ContainsKey("language"))
    {
        // Get language code
        var language = tags["language"].Contains("-") ? tags["language"].Split('-')[0] : tags["language"];

        if (language != "ja")
        {
            // Use OpenAI TTS for non-Japanese languages
            var openAITTS = gameObject.GetComponent<OpenAITTSLoader>();
            modelController.RegisterTTSFunction(openAITTS.Name, openAITTS.GetAudioClipAsync, true);
        }
        else
        {
            // Use VOICEVOX for Japanese
            var voicevoxTTS = gameObject.GetComponent<VoicevoxTTSLoader>();
            modelController.RegisterTTSFunction(voicevoxTTS.Name, voicevoxTTS.GetAudioClipAsync, true);
        }

        // Change speech listener's language
        var openAIListener = gameObject.GetComponent<OpenAISpeechListener>();
        openAIListener.Language = language;

        Debug.Log($"Set language to {language}");
    }
};You can include images from cameras or files in requests to the LLM. Include the image binary data under the key imageBytes in the payloads argument of DialogProcessor.StartDialogAsync.
Additionally, you can enable the system to autonomously capture images when required based on the user's speech. To achieve this, add the tag [vision:camera] in the AI response by configuring it in the system prompt, and implement the image capture process for when this tag is received in the LLM service.
You can use camera to get what you see.
When the user wants to you to see something, insert [vision:camera] into your response message.

Example
user: Look! I bought this today.
assistant: [vision:camera]Let me see.
gameObject.GetComponent<ChatGPTService>().CaptureImage = async (source) =>
{
    if (simpleCamera != null)
    {
        try
        {
            return await simpleCamera.CaptureImageAsync();
        }
        catch (Exception ex)
        {
            Debug.LogError($"Error at CaptureImageAsync: {ex.Message}\n{ex.StackTrace}");
        }
    }

    return null;
};We support cloud-based speech synthesis services such as Google, Azure, OpenAI, and Watson, in addition to VOICEVOX, VOICEROID, and Style-Bert-VITS2 for more characterful and engaging voices. To use a speech synthesis service, attach TTSLoader from ChatdollKit/Extension to the AIAvatar object and check the IsDefault box. If other TTSLoader components are attached, make sure to uncheck the IsDefault box for those not in use.
You can configure parameters like API keys and endpoints on the attached TTSLoader in the inspector. For more details of these parameters, refer to the API references of TTS services.
You can easily create and use a custom TTSLoader for your preferred text-to-speech service. Create a class that inherits from ChatdollKit.Model.WebVoiceLoaderBase, and implement the asynchronous method DownloadAudioClipAsync that takes a Voice object and returns an AudioClip object playable in Unity.
UniTask<AudioClip> DownloadAudioClipAsync(Voice voice, CancellationToken token)Note that WebGL does not support compressed audio playback, so make sure to handle this by adjusting your code depending on the platform.
To achieve fast response times, rather than synthesizing the entire response message into speech, we split the text into smaller parts based on punctuation and progressively synthesize and play each segment. While this greatly improves performance, excessively splitting the text can reduce the quality of the speech, especially when using AI-based speech synthesis like Style-Bert-VITS2, affecting the tone and fluency.
You can balance performance and speech quality by adjusting how the text is split for synthesis in the LLMContentSkill component's inspector.
| Item | Description |
|---|---|
| Split Chars | Characters to split the text at for synthesis. Speech synthesis is always performed at these points. |
| Optional Split Chars | Optional split characters. Normally, the text isn't split at these, but it will be if the text length exceeds the value set in Max Length Before Optional Split. |
| Max Length Before Optional Split | Threshold for text length at which optional split characters are used as split points. |
We support cloud-based speech recognition services such as Google, Azure, and OpenAI. To use these services, attach the SpeechListener component from ChatdollKit/Scripts/SpeechListener to the AIAvatar object. Be aware that if multiple SpeechListeners are attached, they will run in parallel, so ensure that only the one you want is active.
You can configure parameters such as API keys and endpoints on the attached SpeechListener in the inspector. For details of these parameters, please refer to the API references of the respective TTS services and products.
Most of the Voice Recorder Settings are controlled by the AIAvatar component, described later, so any settings in the inspector, except for those listed below, will be ignored.
| Item | Description |
|---|---|
| Auto Start | When enabled, starts speech recognition automatically when the application launches. |
| Print Result | When enabled, outputs the transcribed recognized speech to the console. |
Most of the settings related to the SpeechListener are configured in the inspector of the AIAvatar component.
| Item | Description |
|---|---|
| Conversation Timeout | The waiting time (seconds) before the conversation is considered finished. After this period, it transitions to Idle mode, and the message window will be hidden. To resume the conversation, the wake word must be recognized again. |
| Idle Timeout | The waiting time (seconds) before transitioning from Idle mode to Sleep mode. By default, there is no difference between Idle and Sleep modes, but it can be used to switch between different speech recognition methods or idle animations through user implementation. |
| Voice Recognition Threshold DB | The volume threshold (decibels) for speech recognition. Sounds below this threshold will not be recognized. |
| Voice Recognition Raised Threshold DB | An elevated threshold (decibels) for voice recognition, used to detect louder speech. This is utilized when the Microphone Mute By setting is set to Threshold. |
| Conversation Silence Duration Threshold | If silence is detected for longer than this time, recording ends, and speech recognition is performed. |
| Conversation Min Recording Duration | Speech recognition is performed only if the recorded sound exceeds this duration. This helps to ignore short noises and prevent misrecognition. |
| Conversation Max Recording Duration | If the recorded sound exceeds this time, speech recognition is not performed, and the recording is ignored. This prevents overly long recordings from overburdening speech recognition. |
| Idle Silence Duration Threshold | The amount of silence (seconds) required to stop recording during Idle mode. A smaller value is set to smoothly detect short periods of silence when waiting for the wake word. |
| Idle Min Recording Duration | The minimum recording duration during Idle mode. A smaller value is set compared to conversation mode to smoothly detect short phrases. |
| Idle Max Recording Duration | The maximum recording duration during Idle mode. Since wake words are usually short, a shorter value is set compared to conversation mode. |
| Microphone Mute By | The method used to prevent the avatar's speech from being recognized during speech. - None: Does nothing. - Threshold: Raises the voice recognition threshold to Voice Recognition Raised Threshold DB.- Mute: Ignores input sound from the microphone. - Stop Device: Stops the microphone device. |
You can detect wake words as triggers to start a conversation. You can also configure settings in the AIAvatar component’s inspector for cancel words that end a conversation, or to use the length of recognized speech as a trigger instead of specific phrases.
The conversation starts when this phrase is recognized. You can register multiple wake words. Except for the following items, settings will be ignored in versions 0.8 and later.
| Item | Description |
|---|---|
| Text | Phrase to start conversation. |
| Prefix / Suffix Allowance | The allowable length for additional characters before or after the wake word. For example, if the wake word is "Hello" and the allowance is 4 characters, the phrase "Ah, Hello!" will still be detected as the wake word. |
The conversation ends when this phrase is recognized. You can register multiple cancel words.
You can register strings to be ignored when determining whether the recognized speech matches a wake word or cancel word. This is useful if you don’t want to consider the presence or absence of punctuation.
You can start a conversation based on the length of the recognized text, rather than specific phrases. This feature is disabled when the value is 0. For example, in Idle mode, you can resume the conversation using text length instead of a wake word, and in Sleep mode, the conversation can resume with the wake word.
Using the Tool Call (Function Calling) feature provided by the LLM, you can develop AI characters that function as AI agents, rather than simply engaging in conversation.
By creating a component that inherits from LLMFunctionSkillBase and attaching it to the AIAvatar object, it will automatically be recognized as a tool and executed when needed. To create a custom skill, define FunctionName and FunctionDescription, and implement the GetToolSpec method, which returns the function definition, and the ExecuteFunction method, which handles the function’s process. For details, refer to ChatdollKit/Examples/WeatherSkill.
We provide a device control mechanism. Currently, microphones and cameras are supported.
The MicrophoneManager component captures audio from the microphone and makes the audio waveform data available to other components. It is primarily intended for use with the SpeechListener, but you can also register and use recording sessions through the StartRecordingSession method in custom user-implemented components.
The following are the settings that can be configured in the inspector.
| Item | Description |
|---|---|
| Sample Rate | Specifies the sampling rate. Set it to 44100 when using WebGL. |
| Noise Gate Threshold DB | Specifies the noise gate level in decibels. When used with the AIAvatar component, this value is controlled by the AIAvatar component. |
| Auto Start | Starts capturing audio from the microphone when the application launches. |
| Is Debug | Logs microphone start/stop and mute/unmute actions. |
We provide the SimpleCamera prefab, which packages features such as image capture, preview display, and camera switching. Since the way cameras are handled varies by device, this is provided experimentally. For details, refer to the prefab and the scripts attached to it.
The ModelController component controls the gestures, facial expressions, and speech of 3D models. This component is also used by the AIAvatar and LLMContentSkill components.
Idle animations are looped while the model is waiting. To run the desired motion, register it in the state machine of the Animator Controller and configure the transition conditions by setting the parameter name as the Idle Animation Key and the value as the Idle Animation Value in the ModelController inspector.
To register multiple motions and randomly switch between them at regular intervals, use the AddIdleAnimation method in the code as shown below. The first argument is the Animation object to be executed, weight is the multiplier for the appearance probability, and mode is only specified if you want to display the animation in a particular model state. The constructor of the Animation class takes the parameter name as the first argument, the value as the second, and the duration (in seconds) as the third.
modelController.AddIdleAnimation(new Animation("BaseParam", 2, 5f));
modelController.AddIdleAnimation(new Animation("BaseParam", 6, 5f), weight: 2);
modelController.AddIdleAnimation(new Animation("BaseParam", 99, 5f), mode: "sleep");This section is under construction. Essentially, you create an AnimatedVoiceRequest object and call ModelController.AnimatedSay. The LLMContentSkill internally makes requests that combine animations, expressions, and speech, so refer to that for guidance.
We provide UI component prefabs commonly used in voice-interactive AI character applications. You can use them by simply adding them to the scene. For configuration details, refer to the demo.
- FPSManager: Displays the current frame rate. You can also set the target frame rate using this component.
- MicrophoneController: A slider to adjust the microphone's noise gate.
- RequestInput: A text box for inputting requests. It also provides buttons for retrieving images from the file system and for launching the camera.
- SimpleCamera: A component that handles image capture and preview display from the camera. You can also capture images without showing the preview.
You can send requests to the ChatdollKit application from external programs using socket communication. This feature enables new use cases such as AI Vtuber streaming, remote avatar customer service, and hybrid character operations combining AI and human interaction. Attach the ChatdollKit/Scripts/Network/SocketServer to the AIAvatar object and set the port number (e.g., 8080).
Additionally, to handle dialog requests over the network, attach the ChatdollKit/Scripts/Dialog/DialogPriorityManager to the AIAvatar object. To process requests that make the character perform gestures, facial expressions, or speech created by humans instead of AI responses, attach the ChatdollKit/Scripts/Model/ModelRequestBroker to the AIAvatar object.
Below is a code example for using both of the above components.
// Configure ModelRequestBroker for remote control
var modelRequestBroker = gameObject.GetComponent<ModelRequestBroker>();
modelRequestBroker.RegisterAnimation("angry_hands_on_waist", new Model.Animation("BaseParam", 0, 3.0f));
modelRequestBroker.RegisterAnimation("brave_hand_on_chest", new Model.Animation("BaseParam", 1, 3.0f));
modelRequestBroker.RegisterAnimation("calm_hands_on_back", new Model.Animation("BaseParam", 2, 3.0f));
modelRequestBroker.RegisterAnimation("concern_right_hand_front", new Model.Animation("BaseParam", 3, 3.0f));
modelRequestBroker.RegisterAnimation("energetic_right_fist_up", new Model.Animation("BaseParam", 4, 3.0f));
modelRequestBroker.RegisterAnimation("energetic_right_hand_piece", new Model.Animation("BaseParam", 5, 3.0f));
modelRequestBroker.RegisterAnimation("pitiable_right_hand_on_back_head", new Model.Animation("BaseParam", 7, 3.0f));
modelRequestBroker.RegisterAnimation("surprise_hands_open_front", new Model.Animation("BaseParam", 8, 3.0f));
modelRequestBroker.RegisterAnimation("walking", new Model.Animation("BaseParam", 9, 3.0f));
modelRequestBroker.RegisterAnimation("waving_arm", new Model.Animation("BaseParam", 10, 3.0f));
modelRequestBroker.RegisterAnimation("look_away", new Model.Animation("BaseParam", 6, 3.0f, "AGIA_Layer_look_away_01", "Additive Layer"));
modelRequestBroker.RegisterAnimation("nodding_once", new Model.Animation("BaseParam", 6, 3.0f, "AGIA_Layer_nodding_once_01", "Additive Layer"));
modelRequestBroker.RegisterAnimation("swinging_body", new Model.Animation("BaseParam", 6, 3.0f, "AGIA_Layer_swinging_body_01", "Additive Layer"));

// Get DialogPriorityManager for remote control
var dialogPriorityManager = gameObject.GetComponent<DialogPriorityManager>();

// Configure SocketServer for remote control
gameObject.GetComponent<SocketServer>().OnDataReceived = (request) =>
{
    // Assign actions based on the request's Endpoint and Operation
    if (request.Endpoint == "dialog")
    {
        if (request.Operation == "start")
        {
            dialogPriorityManager.SetRequest(request.Text, request.Payloads, request.Priority);
        }
        else if (request.Operation == "clear")
        {
            dialogPriorityManager.ClearDialogRequestQueue(request.Priority);
        }
    }
    else if (request.Endpoint == "model")
    {
        modelRequestBroker.SetRequest(request.Text);
    }
};The SocketServer is designed to receive arbitrary information via socket communication, so no official client program is provided. However, a Python sample code is available. Please refer to the following and adapt it to other languages or platforms as needed.
https://gist.github.com/uezo/9e56a828bb5ea0387f90cc07f82b4c15
Refer to the following tips for now. We are preparing demo for WebGL.
- It takes 5-10 minutes to build. (It depends on machine spec)
- Very hard to debug. Error message doesn't show the stacktrace:
To use dlopen, you need to use Emscripten’s linking support, see https://github.com/kripken/emscripten/wiki/Linking - Built-in Async/Await doesn't work (app stops at
await) because JavaScript doesn't support threading. Use UniTask instead. - CORS required for HTTP requests.
- Microphone is not supported. Use
ChatdollMicrophonethat is compatible with WebGL. - Compressed audio formats like MP3 are not supported. Use WAV in TTS Loaders.
- OVRLipSync is not supported. Use uLipSync and uLipSyncWebGL instead.
- If you want to show multibyte characters in message window put the font that includes multibyte characters to your project and set it to message windows.
- uLipSync (LipSync) (c)hecomi
- UniTask (async/await integration) (c)neuecc
- UniVRM (VRM) (c)VRM Consortium / (c)Masataka SUMI for MToon