CodeRADActions
|
Tip
|
The Adding actions section in the Getting Started tutorial provides a good introduction to actions. That is a good place to start, if you are new to actions. This page is intended to serve more as reference documentation. |
Actions provide a mechanism for controllers to inject custom functionality into a view. When a view is created, it can query the controller hierarchy for actions in designated categories, and it can use found actions in a variety of ways. It may render actions as buttons or menu items. Some actions it might not render visually, but may still use it to dispatch events through the action when certain conditions occur.
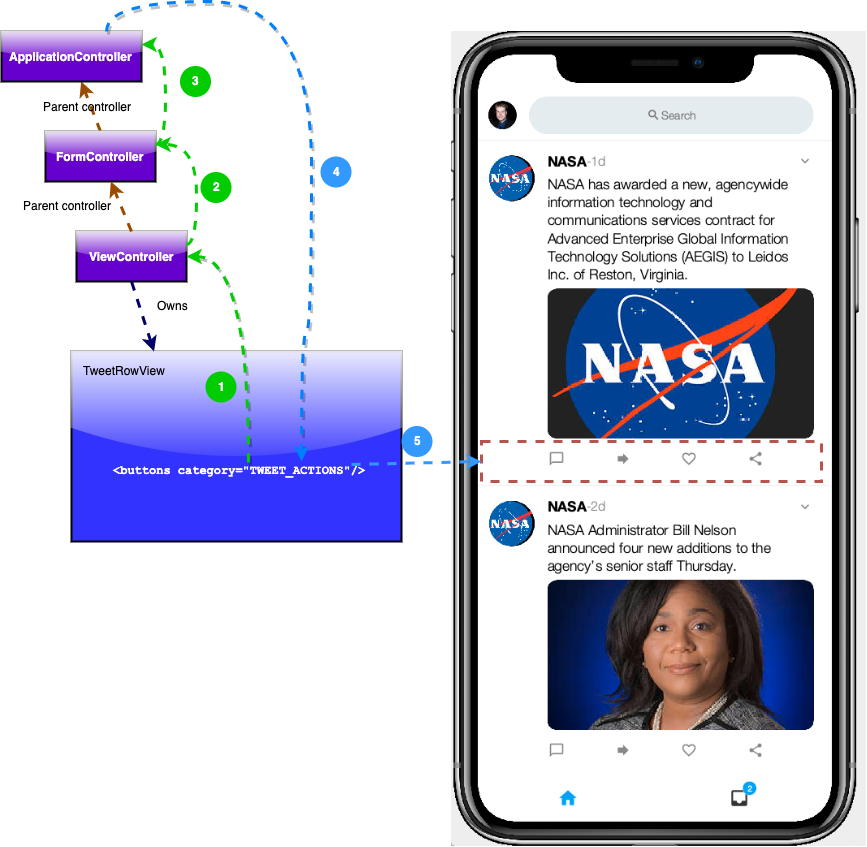
The following figure shows the approximate logic flow when rendering the <buttons> component with actionCategory TWEET_ACTIONS.
-
It looks in the nearest view controller for actions in the TWEET_ACTIONS category.
-
Then it checks ViewController’s parent controller - in this case, a FormController for actions in the TWEET_ACTIONS category.
-
Then it checks the ApplicationController.
-
It compiles all of matching actions and returns them to the view.
-
The view renders the actions as a menu.
|
Note
|
This diagram has an error. The category attribute should be actionCategory. I.e. <buttons actionCategory="TWEET_ACTIONS"/>
|
An action catgory is a marker that designates an action, or set of actions to be used in a certain context by a view. Typically the view will define the categories that it wants to use, and how it wants to use them. For example, a view might define a category named "OVERFLOW_MENU", with the intention of creating an overflow menu of any actions that the controller defines in that category. The controller would then register one or more actions in the OVERFLOW_MENU category. When the view is constructed, it will query the controller for actions in the OVERFLOW_MENU category, and render them as a menu.
You can define action categories directly in a view using the <define-category> tag, for convenience. This will generate a public static final field in the View class. E.g. the following tag:
<define-category name="OVERFLOW_MENU"/>will generate something like the following in the java class:
public static final ActionNode.Category OVERFLOW_MENU = new ActionNode.Category();You don’t need to define your categories in this way. You could also define them directly in Java. Categories should be implemented as static final variables, and should be accessible to both views and controllers. They don’t have any functionality of their own. They are essentially markers whose sole use is for grouping and selecting actions.
|
Tip
|
See Category javadocs. |
See Actions in CodeRAD views for examples of binding Actions in the view.
See also Adding actions in the Getting Started tutorial.
Actions should be created and registered inside the initControllerActions() method of the controller. If you want the action to be available to all parts of the app, then you may add it in the application controller. If it should only be used on a particular view, then it may be more appropriate to add it to a more specific controller for that view.
You should use the ActionNode.builder() method to create a new ActionNode.Builder.
You can use methods like label(String), icon(Image) to configure how you want the action to be rendered in the view.
Once the action is configured, you can register it in a particular category, and add a listener to handle related events via the addToController(Controller, Category, ActionListener) method.
package com.codename1.rad.sampler.controllers;

import com.codename1.rad.controllers.Controller;
import com.codename1.rad.controllers.ViewController;
import com.codename1.rad.nodes.ActionNode;
import com.codename1.rad.sampler.CustomViewControllerSample;
import com.codename1.rad.schemas.Person;
import com.codename1.ui.Dialog;

public class SampleViewController extends ViewController {
    /**
     * Creates a new ViewController with the given parent controller.
     *
     * @param parent
     */
    public SampleViewController(Controller parent) {
        super(parent);
    }


    @Override
    protected void initControllerActions() {
        super.initControllerActions();
        ActionNode.builder()
                .label("Submit")
                .addToController(this, CustomViewControllerSample.SAMPLE_ACTION, evt -> {
                    evt.consume();
                    Dialog.show("Received in "+getClass().getName(), "Name is "+evt.getEntity().getText(Person.name), "OK", null);
                });
    }
}- Adding Actions
-
Section from the Getting Started tutorial on adding actions.