
A service for automating documentation of Python projects.
- Building dependency diagrams similar to UML
- Generating documentation text using AI
- Generating code using dependency diagrams and AI
- Generating unit tests using AI
- Chatting with AI in the context of the entire project or a single module
Python:
- ast (code analysis)
- pydeps (building a dependency graph)
- langchain (generating project documentation)
JavaScript:
Docker (running the main service module, which performs data preparation)
LLM (project documentation generation):
- Gemini
- Custom OpenAI
- Mistral (local)
-
cranberrypy.ini- configuration file. -
main.py- analyzes a project code and prepares data for visualization of diagrams and working with AI. -
core/diagrams/app/workspace.js- building dependency diagrams of a project. -
workspace.html- launchingworkspace.jsand displaying diagrams. -
core/diagrams/app/studio.js- building new project and viewing saved dependency diagrams. -
studio.html- launchingstudio.jsand displaying diagrams. -
chat.py- chat with AI, works in two modes:- chat with the context of the entire project or a separate module
- generating documentation for the selected module
- generating code for the selected diagram
- generating unit tests
-
core/assistant/ai.py- preparing LLM, context of project data and dynamic formation of a query for generating documentation and code -
starter.py- creating a Dockerfile, preparing a container for Cranberrypy and the project under study, installing project dependencies, launchingmain.py. -
temp- directory for temporary files. -
temp/saved- saved data about projects -
temp/source/source_key- source key, the file contains the name of the last project for whichmain.pywas launched. -
examples- typical examples of module dependencies, used to check the visualization of diagrams and unit tests
In the cranberrypy.ini file, you need to fill in the fields:
-
project_path- absolute path to the project (directory must include__init__.pyfile, often this is the working directory) -
relative_source_module- name of the directory relative to which the dependencies in the project are built -
excluded_paths- absolute paths or directory names of the project that need to be excluded during analysis -
python_version- project version -
requirements_path- absolute path to the project file (necessary if the path is different fromproject_path) -
package_installer- available package installers:pip,uv. -
install_kwargs- additional arguments for package installer commandinstall -r ...(if needed) -
root_directory_path- any shared directory for the Cranberrypy service and your project
Example:
[main]
project_path = /home/aleksei/path_to/my_project/src/
relative_source_module = service
excluded_paths =
    venv
    venv39
    .git
    /home/aleksei/path_to/my_project/venv
    /home/aleksei/path_to/my_project/venv39
    /home/aleksei/path_to/my_project/.git

[starter]
python_version = 3.11
requirements_path = /home/aleksei/path_to/my_project/requirements.txt
package_installer = uv
install_kwargs = --trusted-host example.host --extra-index-url  http://example.host/lib/python
root_directory_path = /home/aleksei/path_to/
root_image_path = /app/temp/projects/Use the main.py module. There are two ways to run the module - automatically and manually.
With the automatic option, you need to check if Docker is working.
If Docker is installed and working, run the starter.py script. The script will create a Dockerfile, prepare a container, install dependencies, and run main.py.
The finished data is saved in the temp/saved directory.
The name of the project, as the last data source for main.py, will be written to source_key.
The manual method is recommended if you need to run main.py multiple times.
- Create a virtual environment.
- Install Cranberrypy dependencies in the
requirements.txtfile. - Install project dependencies.
- Run
main.py.
The finished data is saved in the temp/saved directory.
The name of the project, as the last data source for main.py, will be written to source_key.
Cranberrypy uses the GoJS framework.
To view the project dependency diagrams, open the workspace.html file in a browser via IDE (localhost will be launched automatically).
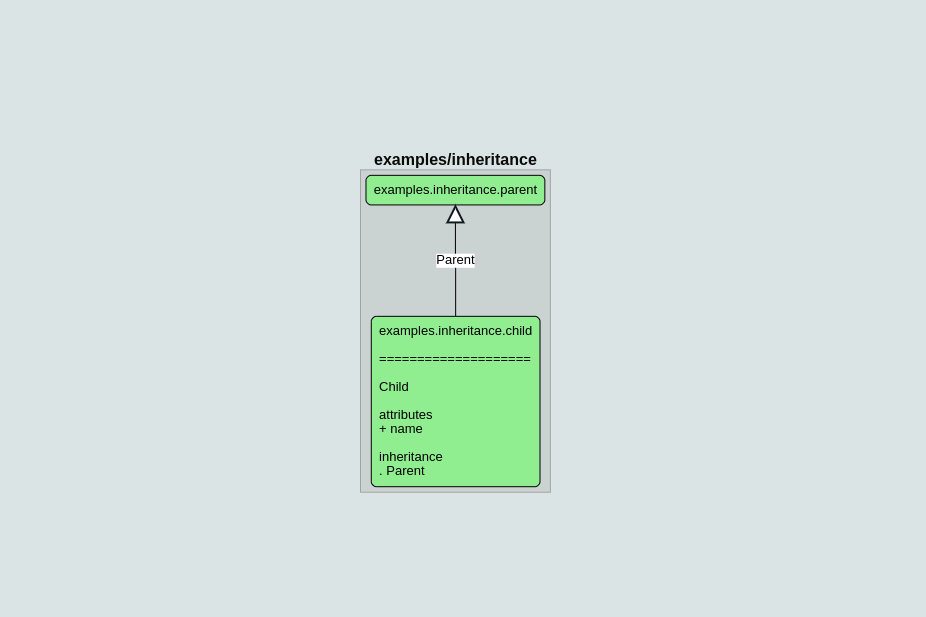
Inheritance
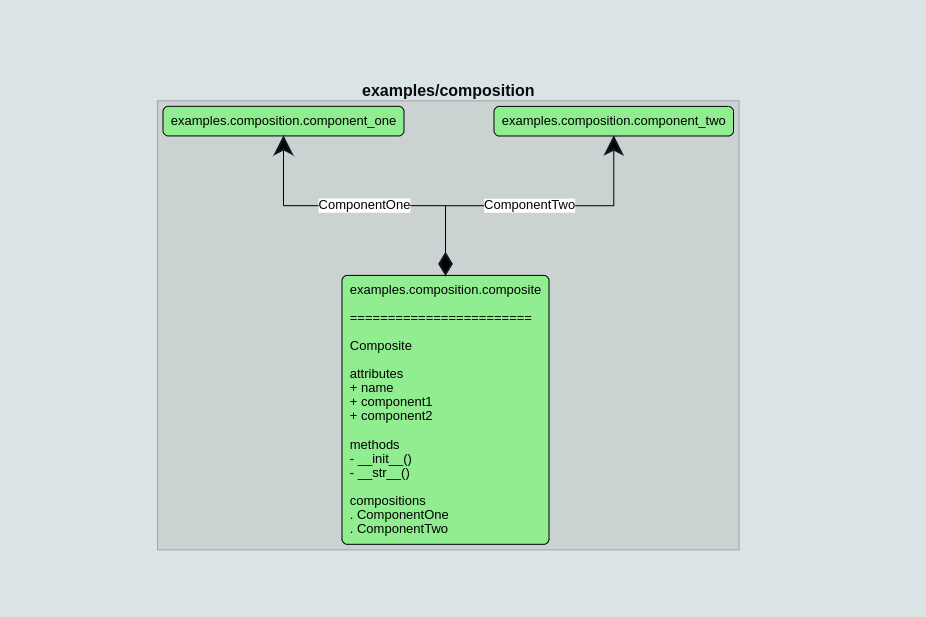
Composition
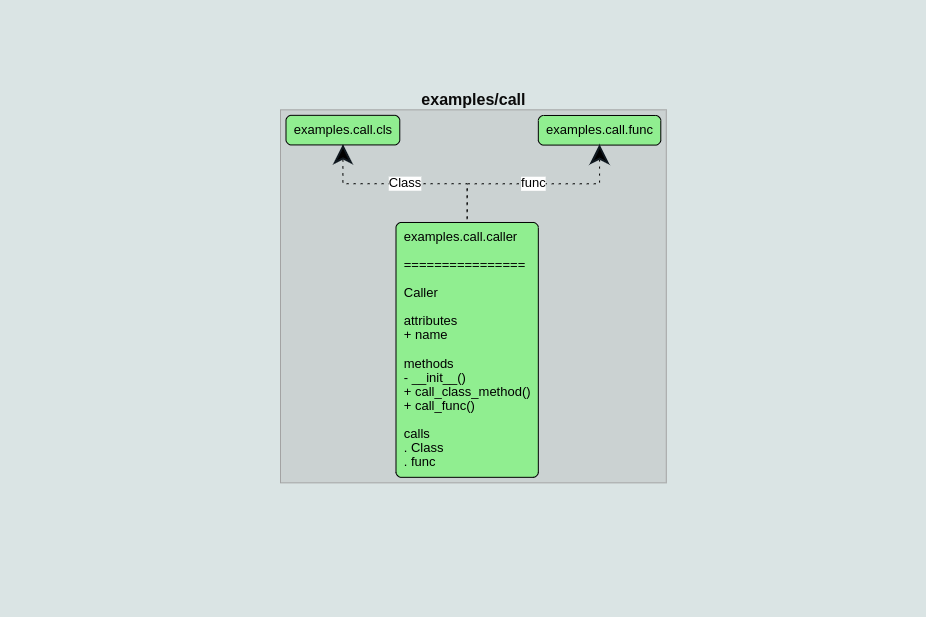
Call
Usage
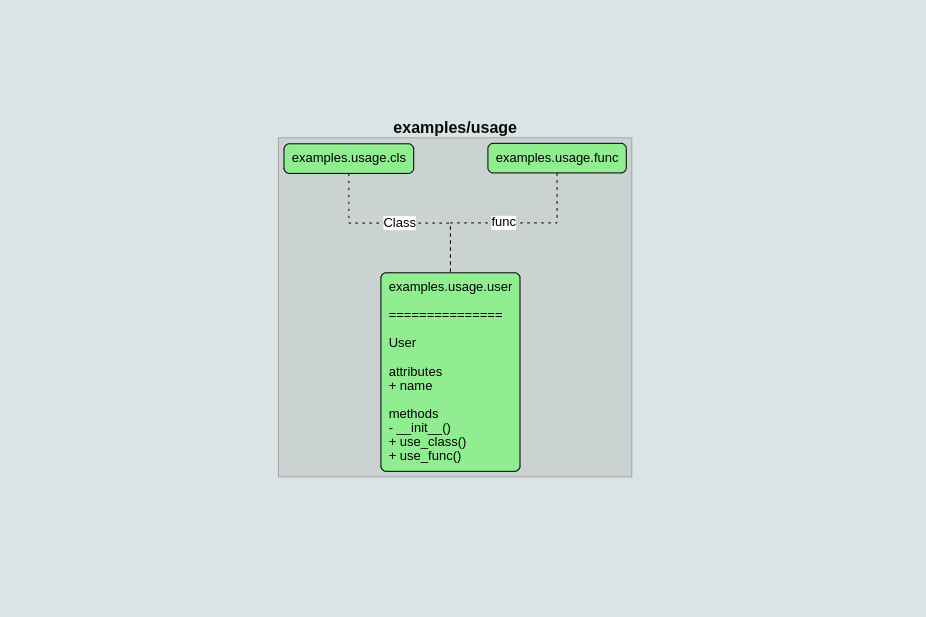
The code of the examples is located in the directory examples.
-
By right-clicking in an empty field, you can select the required project folder.
-
By right-clicking on a module, you can display the module's dependencies or view classes.
-
By right-clicking on a class, you can display the class's dependencies.
To reduce response time and be able to work with the service in the absence of the Internet, you can download the go.js file. Specify the path to the file in workspace.html.
You can quickly check the correctness of the visualization of dependencies by running Cranberrypy on the directory examples.
The text of modules and types of dependencies can be edited, copied and deleted.
-
By left-clicking on a module, you can edit the module's text.
-
By right-clicking on a dependency, you can set dependency type.
-
To save changes, right-click on an empty field, then "SAVE DIAGRAM".
-
To copy, click Ctrl + C, Ctrl + V.
-
To delete, click Delete.
-
To group modules, click Ctrl + G.
-
To ungroup modules, click Ctrl + Shift + G.
-
To cancel changes, click Ctrl + Z.
-
To reset all changes, refresh the page.
When you save a diagram, only the modules and dependencies that are displayed on the page are written to the file.
To view saved diagram, copy the diagram file to temp and specify the path to the file in studio.html, variable savedDiagramPath.
-
In a virtual environment, install the Cranberrypy dependencies in the
ai_requirements.txtfile. -
Fill assistant sections in the
cranberrypy.inifile.-
If you plan to use Gemini:
- generate an API key
- specify
geminitype in theassistantsection - fill API key and model name in the
gemini_assistantsections
-
If you plan to use custom OpenAI:
- specify
custom_openaitype in theassistantsection - fill url, key and model name in the
custom_assistantsections
- specify
-
If you plan to use Mistral:
- specify
mistraltype in theassistantsection
- specify
-
-
Run
chat.py.The first time you run it, the AI data will be prepared, which may take about 5 minutes. When you run it again, the already prepared data will be used.
-
After starting the chat, you need to enter the absolute path of the module.
Copy the file (Ctrl + Shift + C), and paste the path into the terminal.
Documentation is generated according to a given template:
- brief description of the module
- description of classes, methods
- description of module dependencies
If necessary, in chat.py you can change the SYSTEM_PROMPT or switch flags in the generate_documentation method.
-
To activate
generate_code_according_to_diagrammethod in thechat.pymodule. -
After starting the chat, you need to enter the absolute path of the diagram JSON file.
If necessary to apply the project context, you can switch flag in the method.
-
To activate
generate_unit_testsmethod in thechat.pymodule. -
After starting the chat, you need to enter the absolute path of the module.
-
Optional, but if you need to get a more accurate answer for a specific class, method or function, send names of entities.
If necessary to use Pytest framework, you can switch flag in the method.
To get a more accurate and detailed answer, it is recommended reducing the number of entities for test generation.
-
To activate
chatmethod in thechat.pymodule. -
Enter a query.
-
Optional, but if you need to get a more accurate answer for a specific module or several modules of the project, copy and send the absolute path of the module.
The chat only responds to the query and does not save the history of previous queries in context.
The feature allows you to enter queries in AI with a constant set of context data.
-
To activate
chat_with_persistent_contextmethod in thechat.pymodule. -
Specify the module paths in the method.
-
Enter a query.
The chat only responds to the query and does not save the history of previous queries in context.
If you have made changes to your project code and want to quickly generate documentation, unit tests or get a response from AI, use methods with current context:
chat_with_current_contextgenerate_documentation_with_current_contextgenerate_unit_tests_with_current_context
As the current context it uses only the module code.
To change the data source in the temp/source/source_key file, specify the name of the project you need.
You can view the list of available projects in temp/saved.
- Aleksei Fomenko
Thanks for the initial idea, discussions and technical advice to Aleksander Gulin and Aleksander Melnikov.
This project is licensed under the GNU General Public License Version 3.
See the LICENSE file for the full license text.
Copyright (C) 2025 EXANTE