Concept&Go is a web annotation tool aimed at concept mapping. A concept map is a diagram or graphical tool that visually represents relationships between concepts and ideas. Its simplicity is both its strength and weakness. Their graphical appeal makes concept maps very popular among academics and practitioners alike to account for the early stages of domain analysis. Indeed, concept mapping can be a powerful tool in the world of education, helping students to perform at higher cognitive levels and helping teachers to explain complicated subjects and assess student understanding. Likewise, Concept mapping is a group process, making it an ideal activity for teams or groups of stakeholders, and it is especially when solving problems, whether they be in marketing, new product design, or administration. These diagrams are excellent storytellers, helping in the ideation and inspiration phases. When it comes time for implementation, concept maps help with instruction, documentation, and communication.
From this perspective, concept mapping goes beyond concept maps to integrate 'reading' and 'discussing'. Despite this obvious fact, most support for concept mapping stops at diagramming concept maps, leaving learners unassisted when it comes to tracking the readings and discussions behind. For generating concept maps, a variety of software exists, e.g. Inspiration, Hozo, CmapTools, Protégé, or Sero. Utilizing such software provides significant support in creating, manipulating, storing, and reusing concept maps. Yet, in ill-structured, wicked problems where a formal representation does not exist yet, the confidence on a concept map is that of the process that generates it. One of the main premises of this work is that in ill-structured domains, the confidence of concept maps can be leveraged by tracing concepts back to the readings/discussions that ground these concepts. Readings and discussions often leave traces in terms of annotations. Annotating includes highlighting text, adding comments, or classifying the annotated readings. Different studies consider annotation to be a common practice among both academics and practitioners. Here annotations help to bridge the gap between the documentation realm and the conceptual realm.
Díaz, O., & Garmendia, X. (2023, June). Where Are the Readings Behind Your Concept Maps? Annotation-driven Concept Mapping. In International Conference on Advanced Information Systems Engineering (pp. 245-260). Cham: Springer Nature Switzerland.
Concept&Go is a web annotation tool aimed at concept mapping. A concept map is a diagram or graphical tool that visually represents relationships between concepts and ideas. When the reading material (PDF or Web content) is opened in a browser tab, Concept&Go can be activated with a single click. This causes a sidebar to show up on the left part of the document. This sidebar contains the concepts collected so far. Compared with other Web tools (e.g., Diigo), Concept&Go does not stop at highlighting quotes from text paragraphs but elaborates on the so-gathered quotes to come up with concepts and relationships. From this perspective, Concept&Go is not stand-alone but requires two companions: Hypothes.is as the annotations’ persistent storage, and CmapCloud (the cloud service of CmapTools) to depict the developed concept map with its annotations.
You can follow these steps to get Concept%Go up and running
Ensure your computer and you meet the minimum requirements for running Concept&Go.
- Google Chrome browser.
- A Hypothes.is user account (You can register here).
- A CmapCloud user account (You can register here).
You can install the extension in your browser from the following link:
- Open your web browser and navigate to the Concept&Go extension page on the [Browser Extension Store/Marketplace].
- Click the "Add to Browser" or "Install" button to begin the installation process.
- Once the installation is complete, you will see a Concept&Go icon appear in your browser’s toolbar. This indicates that Concept&Go is successfully installed.
Once you have installed it, you have to follow these steps:
Once you have installed Concept&Go, you will find the web extension icon in the right part at the top of the toolbar. We recommend pining it in the toolbar to facilitate the use of the tool.

The next step is to prepare the setup to prepare the application before using it. First, in the “Manage extension” menu you have to activate the permission to allow access to local files.

In order to do that, you have to activate the “Allow access to file URLs” option.

The next step is to configure your Hypothes.is and CmapCloud accounts to be able to annotate and export your concepts and relationships. In this case, you have to open the “Options” menu.

In the following page, first, you have to Log in to your Hypothes.is account and authorize access to it. Then, in the next box, you have to provide the credentials to set up your Cmap Cloud account and click the “Validate account” button.

Once both configurations have been properly set up, the page will show you that you are logged in to both services.
)
You can change your credentials whenever you like in the same menu by clicking the “Log out” and “Change user credentials” options.
Once completed the setup, you are ready to enjoy Concept&Go. See the user manual to learn how to use it.
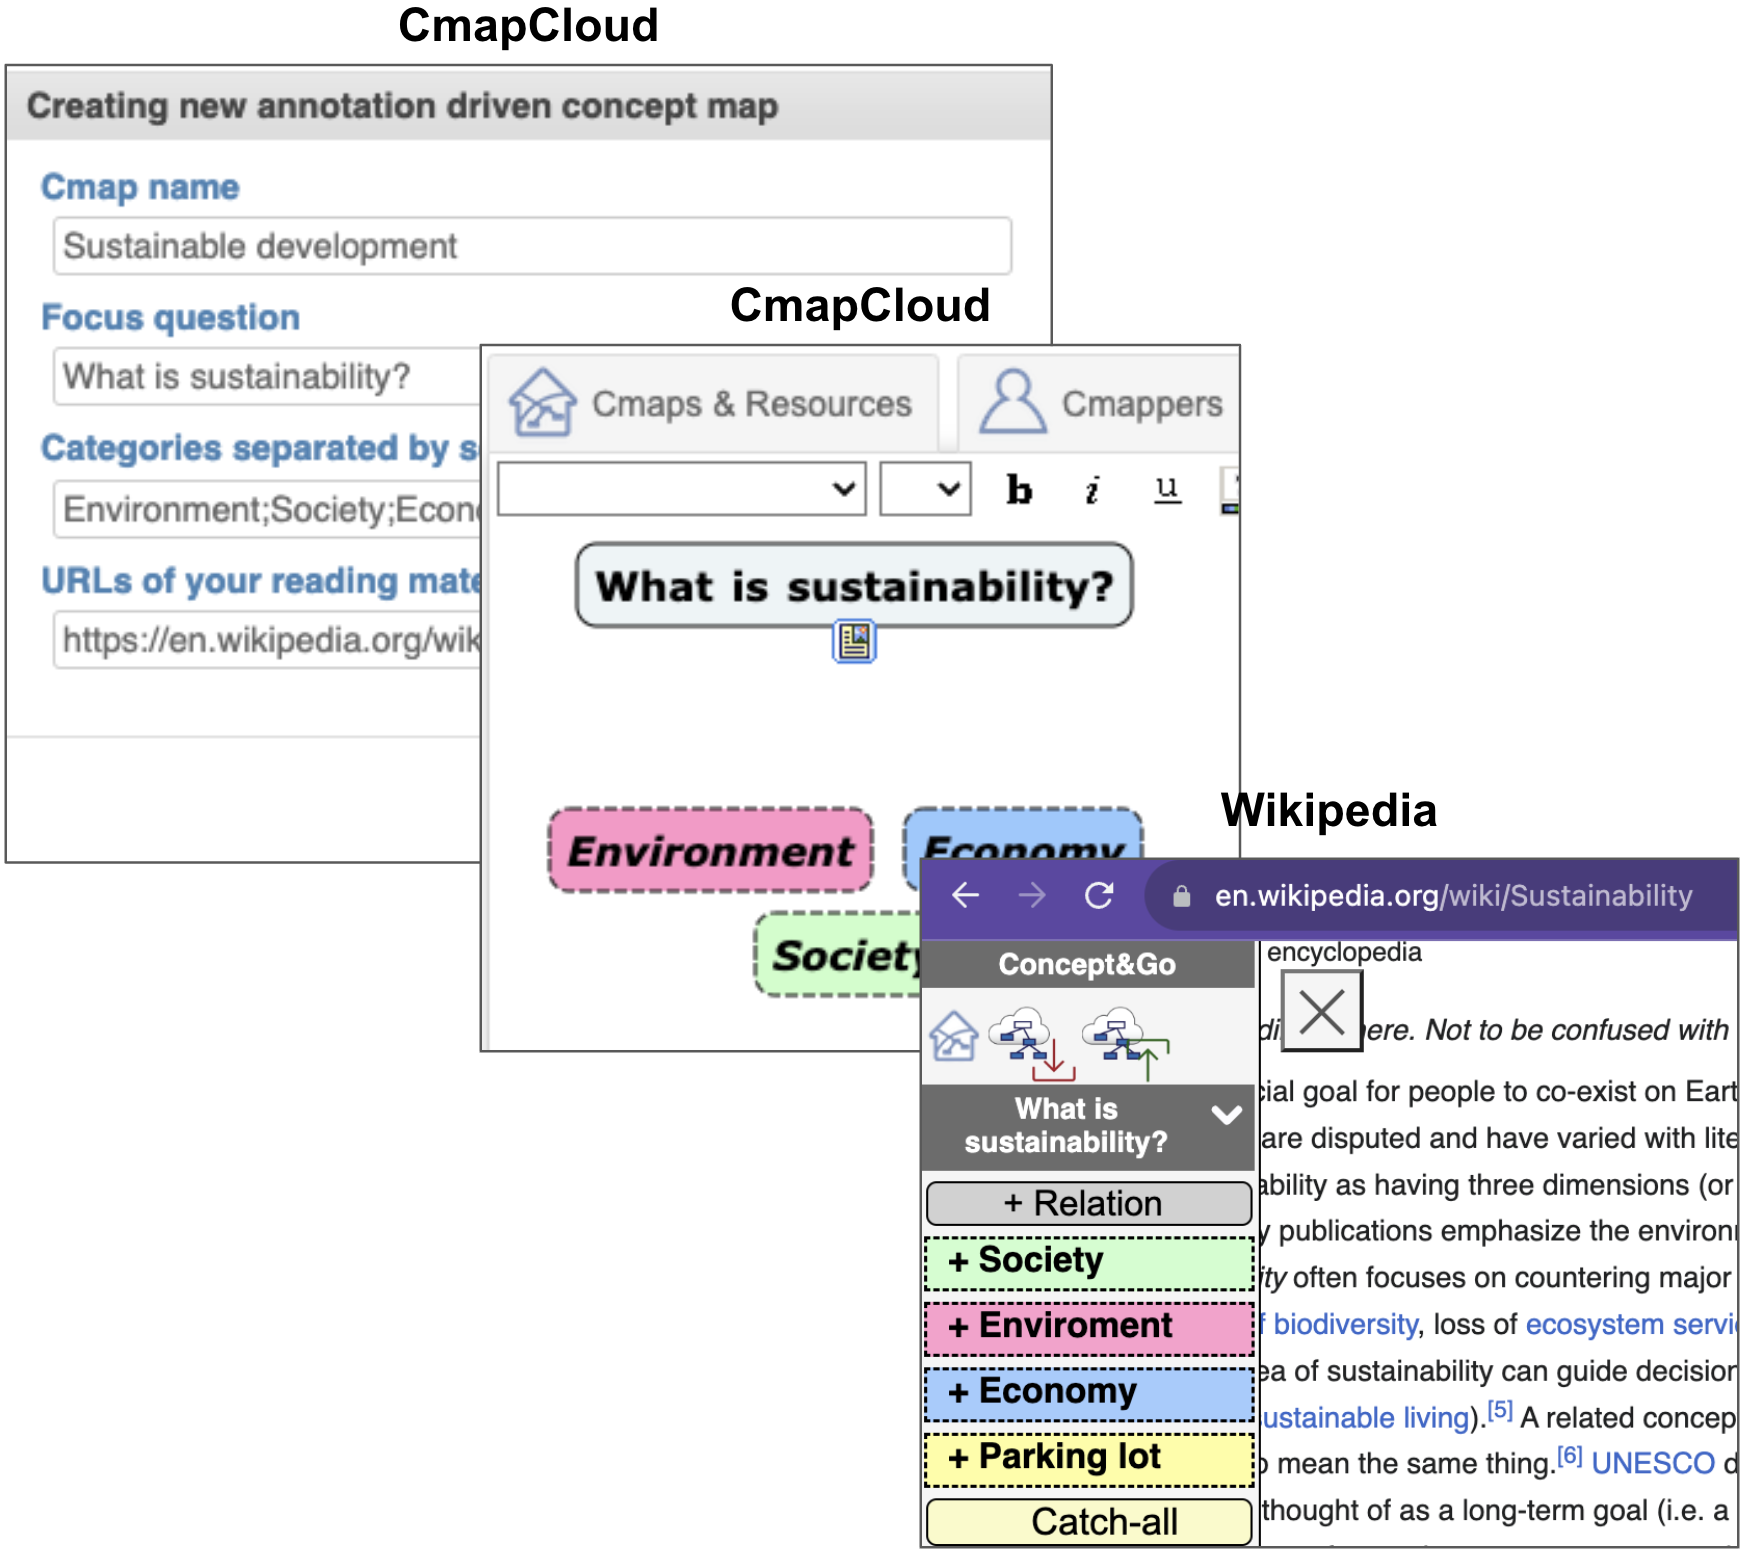
In order to use Concept&Go you will need the following requirements. First of all, Concept&Go by itself does not support all the functionality required. It works together with two other applications for completing the whole concept map assessment.
On the one hand, Hypothes.is is used as persistent storage to allow users to save and retrieve created annotations when necessary. It is a widely-used annotation server that requires users to have an account in Hypothes.is to be able to store annotations there. If you are not registered in Hypothes.is, you will need to create an account at the following link: https://web.hypothes.is/
On the other hand, if Concept&Go also uses CmapCloud (the cloud service of CmapTools) to depict the concepts and relationships gathered during the map construction to visualize them as a concept map with the annotations that support the trace of the map element. In this case you will need a CmapCloud account that can be created in the following link: https://cmapcloud.ihmc.us/login.html

If you encounter any difficulties reaching this point, please don't hesitate to contact xabier.garmendiad@ehu.eus.
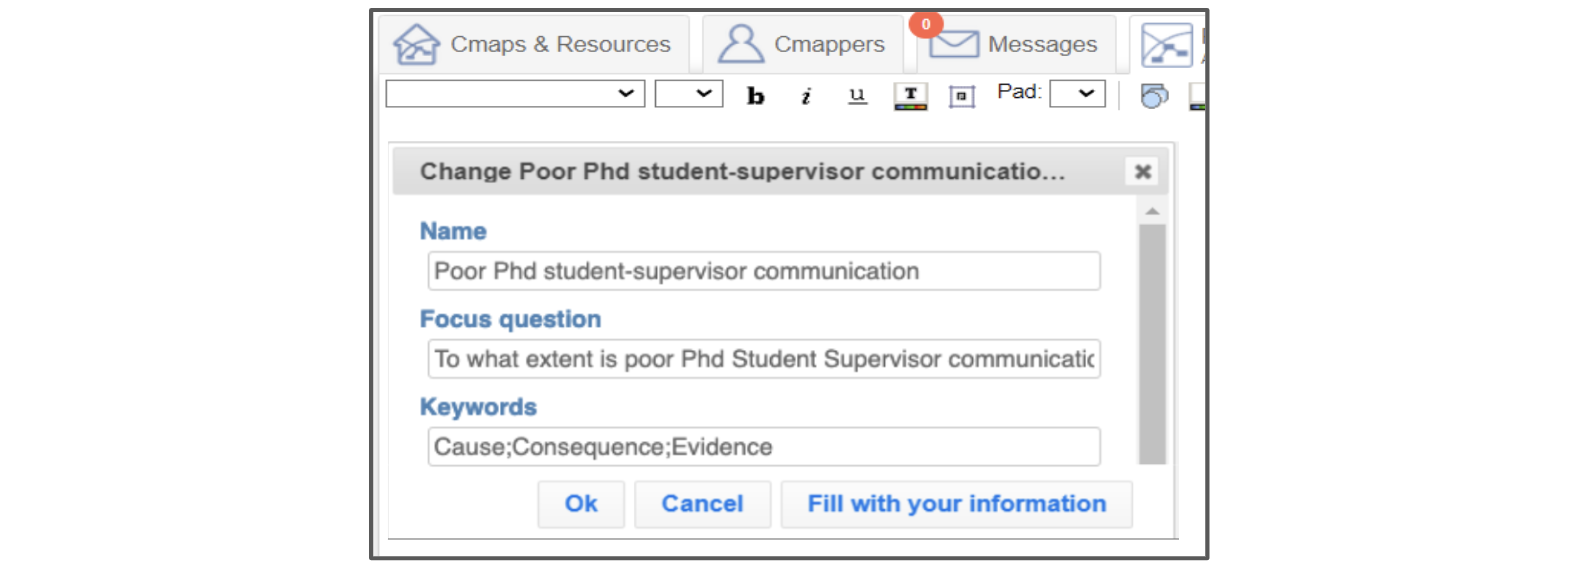
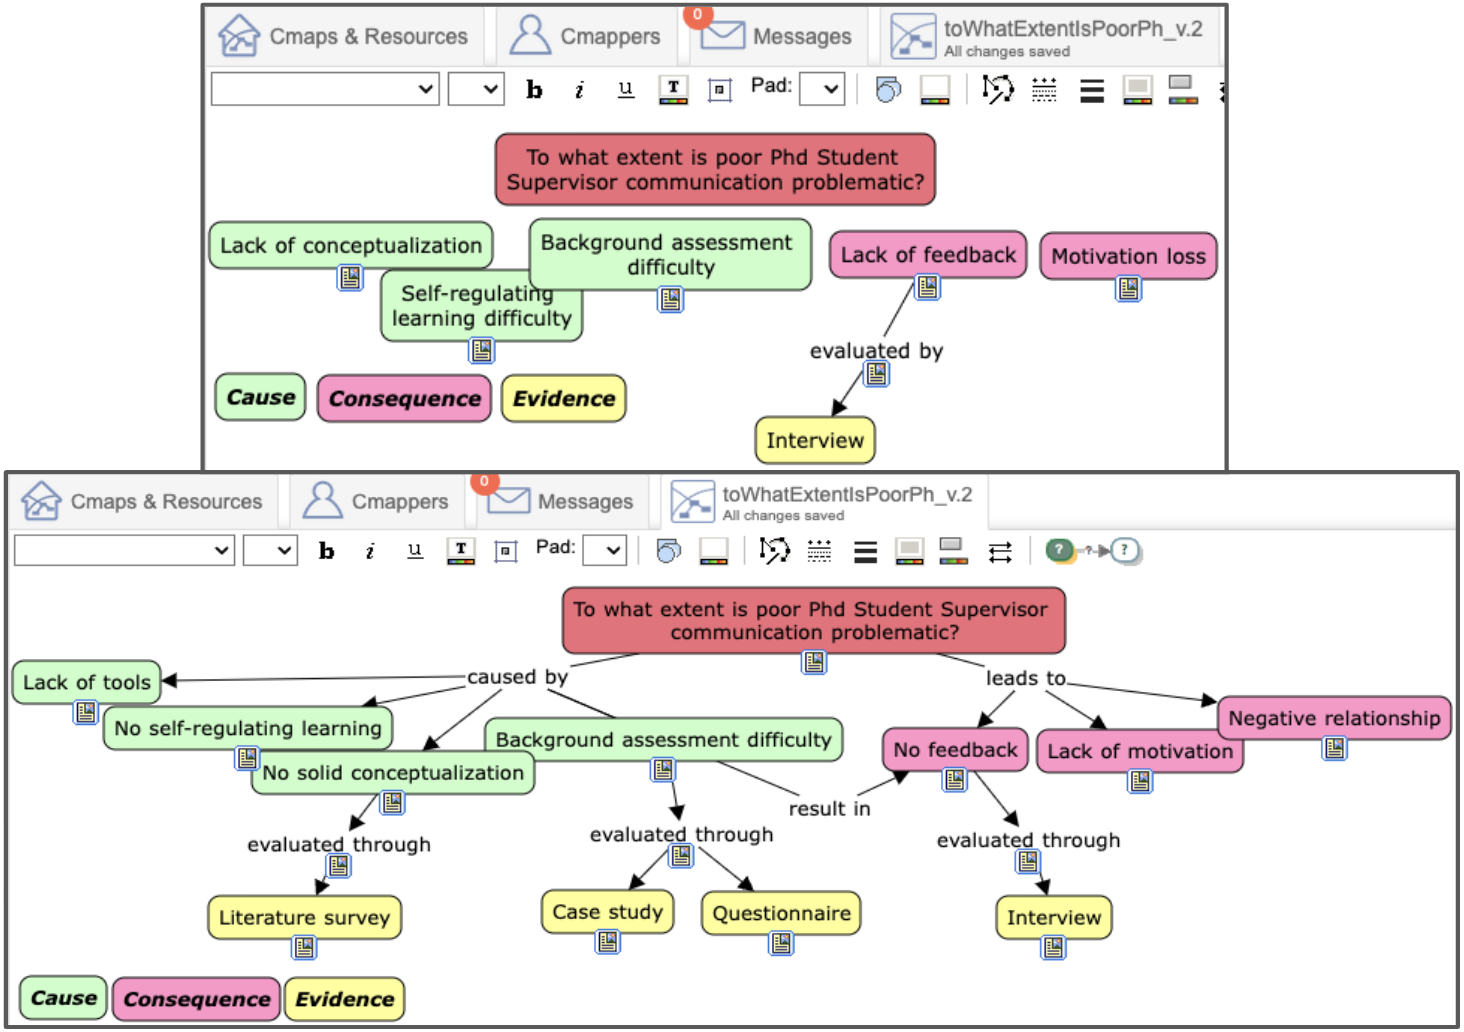
The map construction starts with the supervisor creating a cmap in CmapCloud and defining the focus question that has to be addressed by the students with the provision of a set of meta-concepts that will guide the student during concept mapping. When it comes to concept mapping, the focus question is meant to provide ‘a clearly defined goal for reading’ . However, our experience is that this falls short. As an example, consider the question ‘To what extent is student-supervisor communication problematic in DSR doctoral studies?’. Our experience is that this question may still be too open, risking cognitive overload. To fight this back, supervisors can set up a list of ‘meta-concepts’ that help structure the answer to the focus question. Back to our sample question, this question’s narrative can be articulated through meta-concepts such as ‘cause’, ‘consequence, or ‘evidence’, and in doing so, it guides the gathering of new concepts. On these premises, the form for the focus question in CmapTool’s is being reinterpreted. Specifically, Concept&Go resorts to the keyword entry to hold the meta-concepts (see the following figure).
Then, the student can start the activity by (1) exporting the supervisor provided Cmap and (2) importing it in Concept&Go:
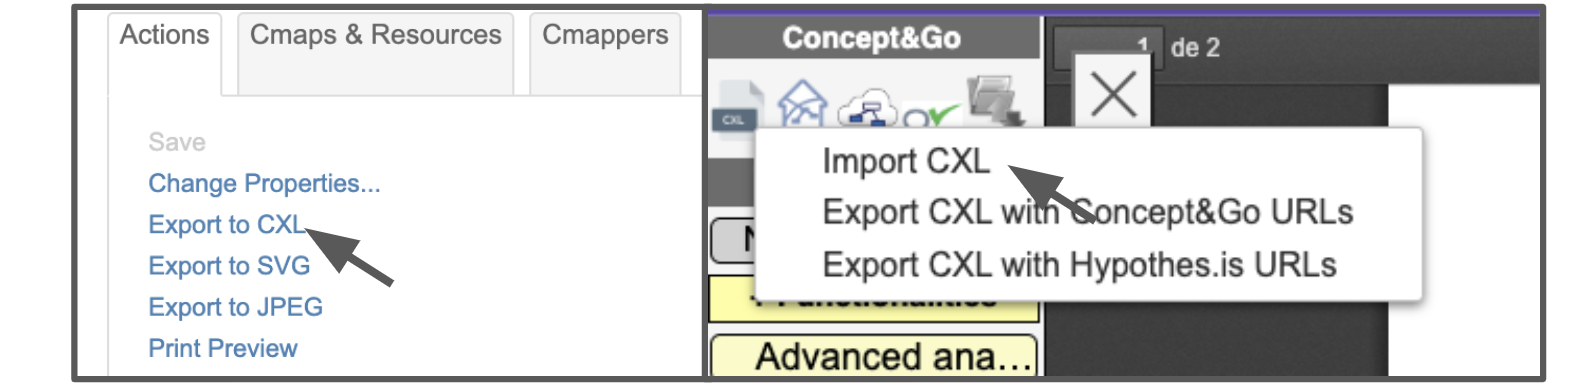
From the specified keywords, Concept&Go generates a dedicated color-coded highlighter. In the highlighter, color coding is used to denote meta-concepts (3). In the highlight object, a property keeps the associated meta-concept.
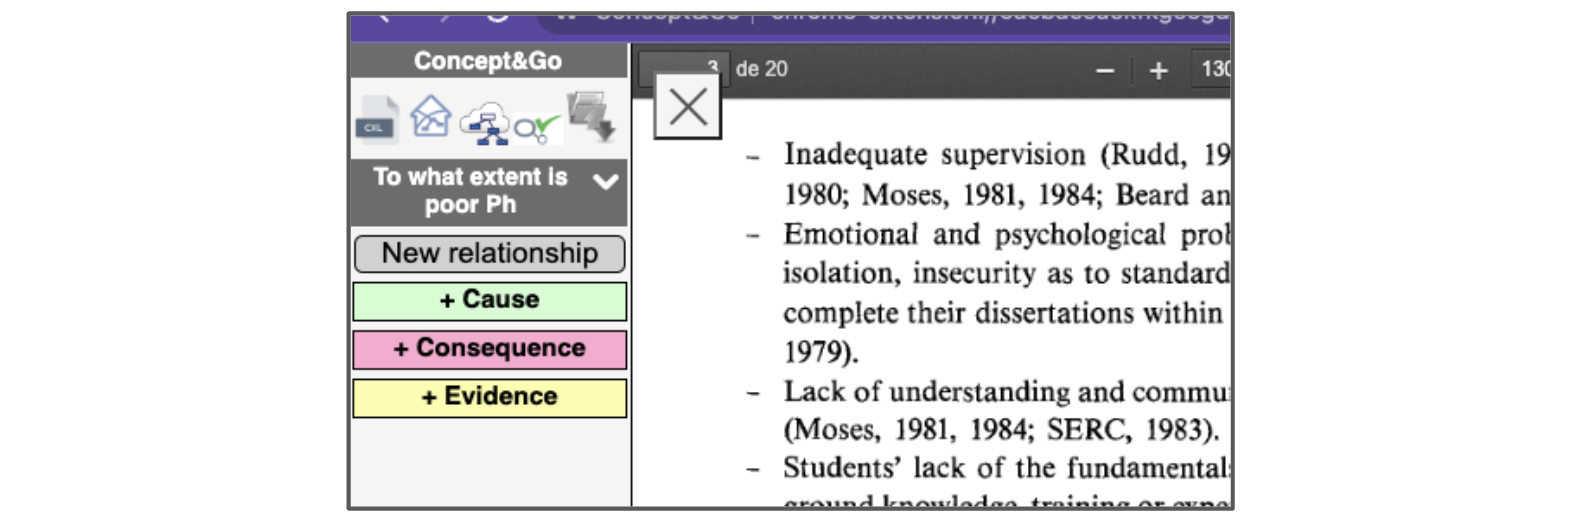
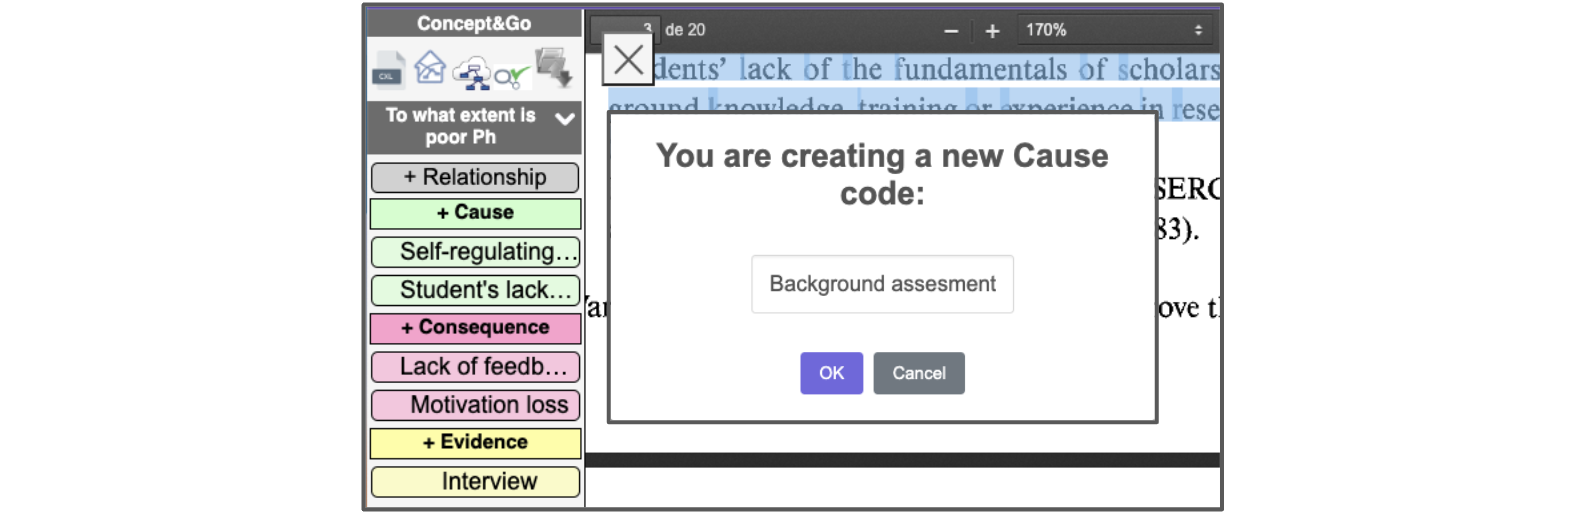
Now, the student locates excerpts that sustain these concepts. The student can highlight text from the reading visor that displays the research article and create concepts based on the meta-concepts. By underlining a text excerpt and clicking one of the meta-concepts buttons a new window is opened to create a new concept. The figure shows the case for Background assessment:
The next step is to create the relationships between concepts. Relationships are made up of two concepts that are linked by a linking word. As well as with concepts, users can find concept-link-concept triples propositions in reading materials. These relationships can be found written explicitly, implicitly or in a table form. Therefore, the user has to be able to capture the relationship by annotating the linking word in the same way as with concepts. To complete a relationship it is necessary to provide the "from" and "to" concepts together with the lin

After some reading, the student returns to CmapTools. On loading the Cmap, Concept&Go retrieves codes, relation annotations, and highlights that are turned into concepts, relationships, and resources, respectively. During the supervisory meeting, this concept map can be changed;
After capturing the map elements that are relevant for the student, the student has to export the annotated content as a concept map to review the result. Concept&Go provides the option to export a concept map and the created annotations to a CmapCloud account. For that, the student has to provide his/her CmapCloud user credentials to associate the tool with the CmapCloud account. Once the association is done, students are able to export the concept map. You can export the concept map by two ways. If you click the first option of the toolset, you can download all the files of the concept map and upload them then manually to your CmapTools. Instead, if you select the second button all the files (except the one on the map (.cxl)) are exported automatically to the Cmap Cloud account. The cxl file is downloaded in the browser and has to be uploaded manually in the corresponding folder of Cmap Cloud. For both options, you have the chance to export the concept map with the Concept&Go generated URL or with the Hypothes.is generated ones.

The concept map is exported in a folder that is automatically generated in the CmapCloud home folder with the name of the concept map and its version. The folder contains the file that represents the concept map and the web annotation resources (URLs) that are referenced within the concept map.
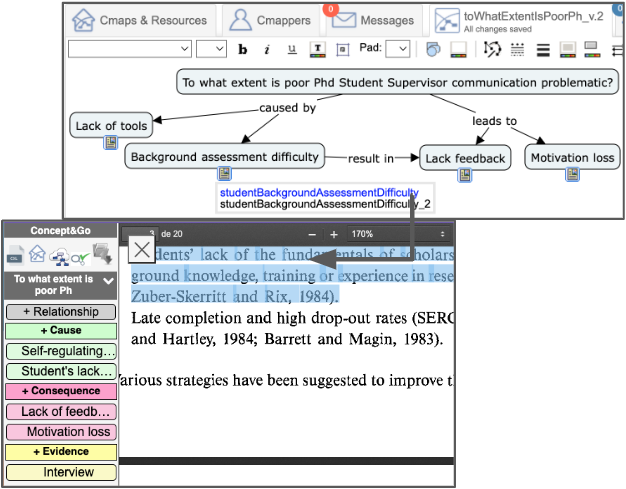
Concept&Go turns the CmapTools canvas into an index of the student's bibliography. This use of concept maps as navigational tools to existing material is reported in the literature. Click on a resource to go back to the reading material, specifically, at the point where the excerpt is placed. Notice 'Lack of tools' at the bottom of the highlighter.
By supporting annotations as URLs rather than mere text, it is possible to navigate back to the reading material. The next figure shows the case for ‘organisms’. Concepts are now displayed together with their annotation counterparts. Click on the annotation icon (), to open the annotations in subsequent browser tabs (see Fig. 2.3). Students can then go back to the reading sources where the annotation appears, check back their annotations, update as appropriate, and when convenient, move back to see the whole picture again in CmapCloud.
CmapCloud provides a means for the instructor to provide notes on the learner's map: select distinct map nodes, right-click, and create a textual note (see Figure \ref{fig:selectiveFeedback}(a)). This is an appropriate departing point. It makes notes specific, i.e., pointing to instances in the learner's assignment where the feedback applies. Besides specific, Nicol's quality model also includes the attributes contextualized and selective.
Contextualized feedback is intended to provide feedback that is linked to the learning outcomes. We might structure `the learning outcomes' in terms of categories the learner has to consider while unfolding the concept map. Concept&Go allows the instructor to define a set of categories when they define the focus question. These categories are automatically rendered in the mapping canvas and color coding is used to map concepts to categories. The instructor can now see at a glance how well the distinct categories are covered and quickly identify gaps in the narrative.
Selective feedback is feedback based on the learner’s prior knowledge and previous work. In the case of using concept mapping as a follow-up strategy in meaningful learning from text, the learner’s previous work may refer to his reading, particularly his annotations.Concept&Go turns annotation into Web object, and hence URI addressable. This allows the instructor to refer to these URI into the feedback. This turns textual notes into hypertext, i.e., text and hyperlinks intermingled, making excerpts just a click away for the learner to consult. Akin to CmapCloud way of working, the instructor first selects the concepts to which the note applies. Once selected, right-click for the feedback note to show up. The feedback note extends the CmapCloud by adding the date and a drop-down menu with the set of annotations made by the learner on the concept/relations the note applies to.

Last Figure illustrates the case where the feedback note includes a reference to anno0. Clicking on this link will open a new browser tab with the Wikipedia page displayed at the place where the annotation appears.
Concept&Go is a browser extension and it is developed with web development technologies: JavaScript, Node and Gulp. It is developed over the last Manifest version (Manifest version 3)
The web extension follows the standard web browser extension architecture with content script modules to manage the web content and background scripts to manage the local storage and Hypothes.is and CmapCloud communications.
To develop from the source code, you will need to install node and gulp to build the extension. This are the required versions
- Node v16.20.0 or greater
- Gulp v4
Concept&Go communicates with CmapCloud via API (CmapCloud API DOCUMENTATION). Concept&Go communicates with Hypothes.is via Hypothes.is API Client developed for Node (Hypothes.is Client)
The artifact code is organized as follows:

These are the main components:
- images. This folder contains the images within the browser extension.
- pages. This folder contains the html files of the extension.
- scripts. This is the main component, it contains the scripts to make the extension work. Based on a web extension architecture this is the main classes:
- Content Script: contentScript.js, this is the script that is executed when MindMeister is accessed
- Service worker: background.js, this script initializes all the background scripts to enable the communications
- Options file: options.js, this is the script executed when the option page is opened
- The rest of scripts are organized in the following folders. - codebook -> Classes associated with the codebook a Concept is represented by a Theme and these are grouped in Dimensions. - importExport -> Here you can find the files associated with importing and exporting the content with CmapCloud. - contentScript -> contains the main scripts to control the annotated content.
To compile the project, you only need to execute the following lines, but make sure you have the node and gulp versions specified in the Development Enviroment section.
$ npm install
$ gulp default
Run $ gulp --watch and load the dist-directory into chrome.
There are two kinds of entryfiles that create bundles.
- All js-files in the root of the
./app/scriptsdirectory - All css-,scss- and less-files in the root of the
./app/stylesdirectory
$ gulp
| Option | Description |
|---|---|
--watch |
Starts a livereload server and watches all assets. To reload the extension on change include livereload.js in your bundle. |
--production |
Minifies all assets |
--verbose |
Log additional data to the console. |
--vendor |
Compile the extension for different vendors (chrome, firefox, opera, edge) Default: chrome |
--sourcemaps |
Force the creation of sourcemaps. Default: !production |
Zips your dist directory and saves it in the packages directory.
$ gulp pack --vendor=firefox
Increments version number of manifest.json and package.json,
commits the change to git and adds a git tag.
$ gulp patch // => 0.0.X
or
$ gulp feature // => 0.X.0
or
$ gulp release // => X.0.0
The build tool also defines a variable named process.env.NODE_ENV in your scripts. It will be set to development unless you use the --production option.
To contribute please contact xabier.garmendiad@ehu.eus.
This project has been developed in a research setting. The aim is to explore the benefits of AI for problem analysis so future plans seek to evaluate the artifact in real settings
Use node 10.24.1
$ npm install
Run $ gulp --watch and load the dist-directory into chrome.
There are two kinds of entryfiles that create bundles.
- All js-files in the root of the
./app/scriptsdirectory - All css-,scss- and less-files in the root of the
./app/stylesdirectory
$ gulp
| Option | Description |
|---|---|
--watch |
Starts a livereload server and watches all assets. To reload the extension on change include livereload.js in your bundle. |
--production |
Minifies all assets |
--verbose |
Log additional data to the console. |
--vendor |
Compile the extension for different vendors (chrome, firefox, opera, edge) Default: chrome |
--sourcemaps |
Force the creation of sourcemaps. Default: !production |
Zips your dist directory and saves it in the packages directory.
$ gulp pack --vendor=firefox
Increments version number of manifest.json and package.json,
commits the change to git and adds a git tag.
$ gulp patch // => 0.0.X
or
$ gulp feature // => 0.X.0
or
$ gulp release // => X.0.0